> ## Documentation Index
> Fetch the complete documentation index at: https://docs.5x.co/llms.txt
> Use this file to discover all available pages before exploring further.
# Development Workflows
> Learn how to develop dbt models, Python applications, Streamlit dashboards, and Metrics project using the IDE with best practices and examples
**Focus:** Master the development workflows for different types of data applications, from dbt transformations to Python scripts and interactive Streamlit dashboards.
The 5X IDE provides specialized development environments for the most common data development tasks. This guide covers practical workflows for building data models, applications, and dashboards with real examples and best practices.
**Development Environment**
The IDE comes pre-configured with multiple Python versions, dbt environments, and development tools. No additional setup required for basic development tasks.
## Python development
### **Python environment overview**
The IDE comes pre-installed with multiple Python versions managed through pyenv, providing flexibility for different project requirements and dependency compatibility.
**Available Python versions:**
* **Python 3.8.20** - Extended legacy support for older projects
* **Python 3.9.23** - Legacy support for older projects
* **Python 3.10.18** - Stable version with good package compatibility
* **Python 3.11.13** - Default version (set by PYENV\_VERSION)
* **Python 3.12.11** - Latest stable with performance improvements
* **Python 3.13.4** - Cutting-edge features and optimizations
**View installed versions:**
```bash theme={null}
ls /root/.pyenv/versions
```
### **Virtual environment management**
Python virtual environments provide isolated dependency management for your projects, preventing conflicts between different project requirements.
**Create a virtual environment:**
```bash theme={null}
# Using Python 3.11.13 (default)
/root/.pyenv/versions/3.11.13/bin/python -m venv my_project_env
# Using specific Python version
/root/.pyenv/versions/3.10.18/bin/python -m venv legacy_project_env
```
**Activate and manage environments:**
```bash theme={null}
# Activate environment
source my_project_env/bin/activate
# Verify active environment (should show your env path)
which python
# Deactivate when finished
deactivate
```
### **Dependency management best practices**
Maintain project dependencies using requirements.txt files for reproducible environments across team members and deployment targets.
**Create requirements.txt:**
```text theme={null}
# Core data processing
pandas==2.0.3
numpy==1.24.3
# API and web requests
requests==2.31.0
urllib3==2.0.4
# Visualization
matplotlib==3.7.2
seaborn==0.12.2
# Development tools
jupyter==1.0.0
pytest==7.4.0
```
**Install and manage dependencies:**
```bash theme={null}
# Activate environment first
source my_project_env/bin/activate
# Install from requirements file
pip install -r requirements.txt
# Install additional packages and update requirements
pip install scikit-learn==1.3.0
pip freeze > requirements.txt
```
### **Python development examples**
**Data processing script:**
```python theme={null}
import pandas as pd
import numpy as np
from sqlalchemy import create_engine
def process_customer_data(connection_string):
"""Process customer data from warehouse"""
engine = create_engine(connection_string)
# Load data
df = pd.read_sql("SELECT * FROM customers", engine)
# Data transformations
df['full_name'] = df['first_name'] + ' ' + df['last_name']
df['customer_tier'] = pd.cut(df['total_spent'],
bins=[0, 100, 500, 1000, float('inf')],
labels=['Bronze', 'Silver', 'Gold', 'Platinum'])
# Save processed data
df.to_sql('processed_customers', engine, if_exists='replace', index=False)
return df
if __name__ == "__main__":
# Your connection string here
conn_str = "your_connection_string"
result = process_customer_data(conn_str)
print(f"Processed {len(result)} customers")
```
**API integration example:**
```python theme={null}
import requests
import json
from datetime import datetime
class DataAPI:
def __init__(self, base_url, api_key):
self.base_url = base_url
self.headers = {'Authorization': f'Bearer {api_key}'}
def fetch_data(self, endpoint, params=None):
"""Fetch data from API endpoint"""
response = requests.get(
f"{self.base_url}/{endpoint}",
headers=self.headers,
params=params
)
response.raise_for_status()
return response.json()
def process_and_save(self, endpoint, db_connection):
"""Fetch, process, and save data to database"""
data = self.fetch_data(endpoint)
# Process data
df = pd.DataFrame(data)
df['processed_at'] = datetime.now()
# Save to database
df.to_sql('api_data', db_connection, if_exists='append', index=False)
return df
```
## dbt development
### **dbt Power User extension (recommended approach)**
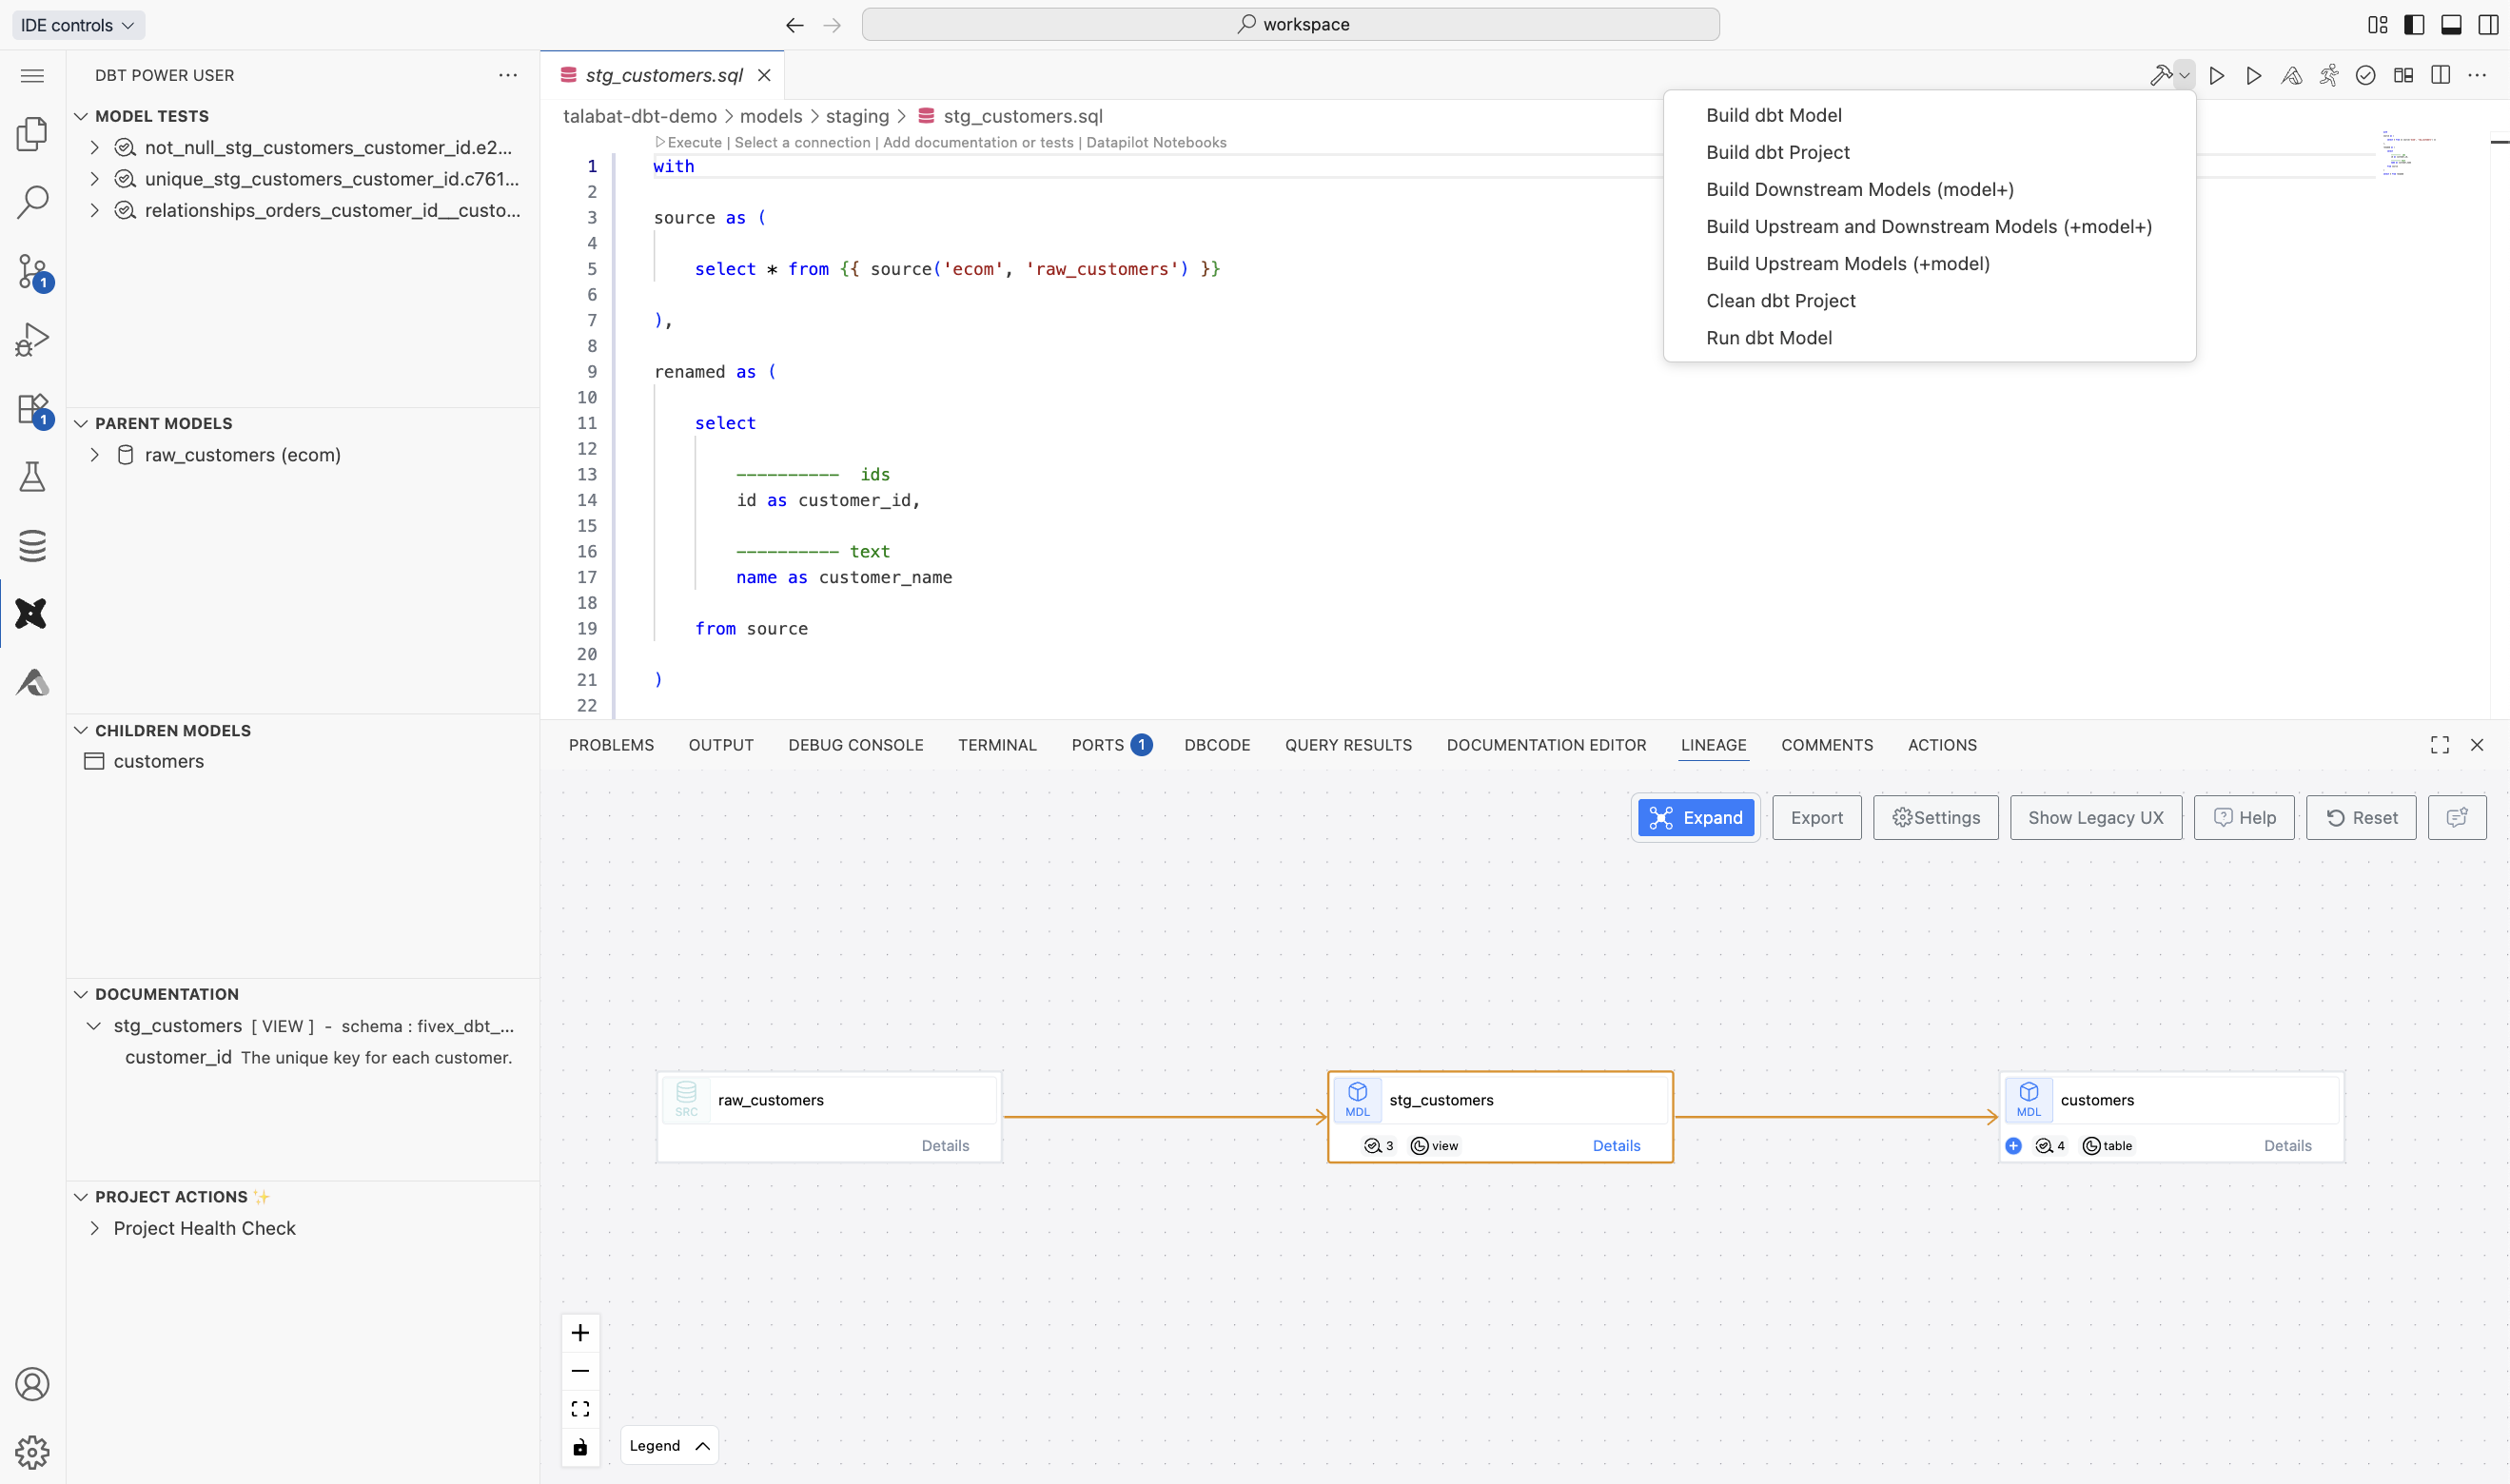
The dbt Power User extension provides the most integrated development experience, automatically using your configured dbt settings from Settings → Credentials including version selection, database connections, and target configuration.
**Key workflows:**
**Run and test models**
Execute individual models, selections, or entire dbt projects with integrated test runner
**Understand dependencies**
Interactive dependency graphs showing upstream and downstream model relationships
**Generate docs**
Create and view dbt documentation with integrated preview and automatic refresh
**Preview compiled SQL**
See the actual SQL that will be executed before running models
### **Command-line dbt development**
For users preferring terminal-based workflows, the IDE provides pre-configured dbt virtual environments for each supported version.
**Activate dbt environment:**
```bash theme={null}
# List available dbt environments
ls /root/.venv
# Activate specific dbt version
source /root/.venv/dbt-1.8.9/bin/activate
# Verify dbt installation
dbt --version
```
**Available dbt versions:**
* **dbt-1.6.18** (`/root/.venv/dbt-1.6.18/`) - Legacy support
* **dbt-1.7.19** (`/root/.venv/dbt-1.7.19/`) - Stable version
* **dbt-1.8.9** (`/root/.venv/dbt-1.8.9/`) - Current stable
* **dbt-1.9.10** (`/root/.venv/dbt-1.9.10/`) - Latest features
### **dbt development workflow**
**Common dbt commands:**
```bash theme={null}
# Navigate to your dbt project directory
cd /path/to/your/dbt/project
# Run entire project
dbt run
# Run specific models
dbt run --select staging.stg_customers+
# Test your models
dbt test
# Generate documentation
dbt docs generate
dbt docs serve
```
**Model development example:**
```sql theme={null}
-- models/staging/stg_customers.sql
SELECT
customer_id::int AS customer_id,
LOWER(TRIM(email)) AS email,
INITCAP(first_name) AS first_name,
INITCAP(last_name) AS last_name,
created_at::timestamp AS created_at,
CASE
WHEN status = 'A' THEN 'active'
WHEN status = 'I' THEN 'inactive'
ELSE 'unknown'
END AS status
FROM {{ source('crm', 'customers') }}
WHERE customer_id IS NOT NULL
```
**Model testing:**
```yaml theme={null}
# models/schema.yml
version: 2
models:
- name: stg_customers
description: "Cleaned customer data from CRM system"
columns:
- name: customer_id
description: "Unique customer identifier"
tests:
- unique
- not_null
- name: email
description: "Customer email address"
tests:
- not_null
- unique
```
### **Lineage visualization**
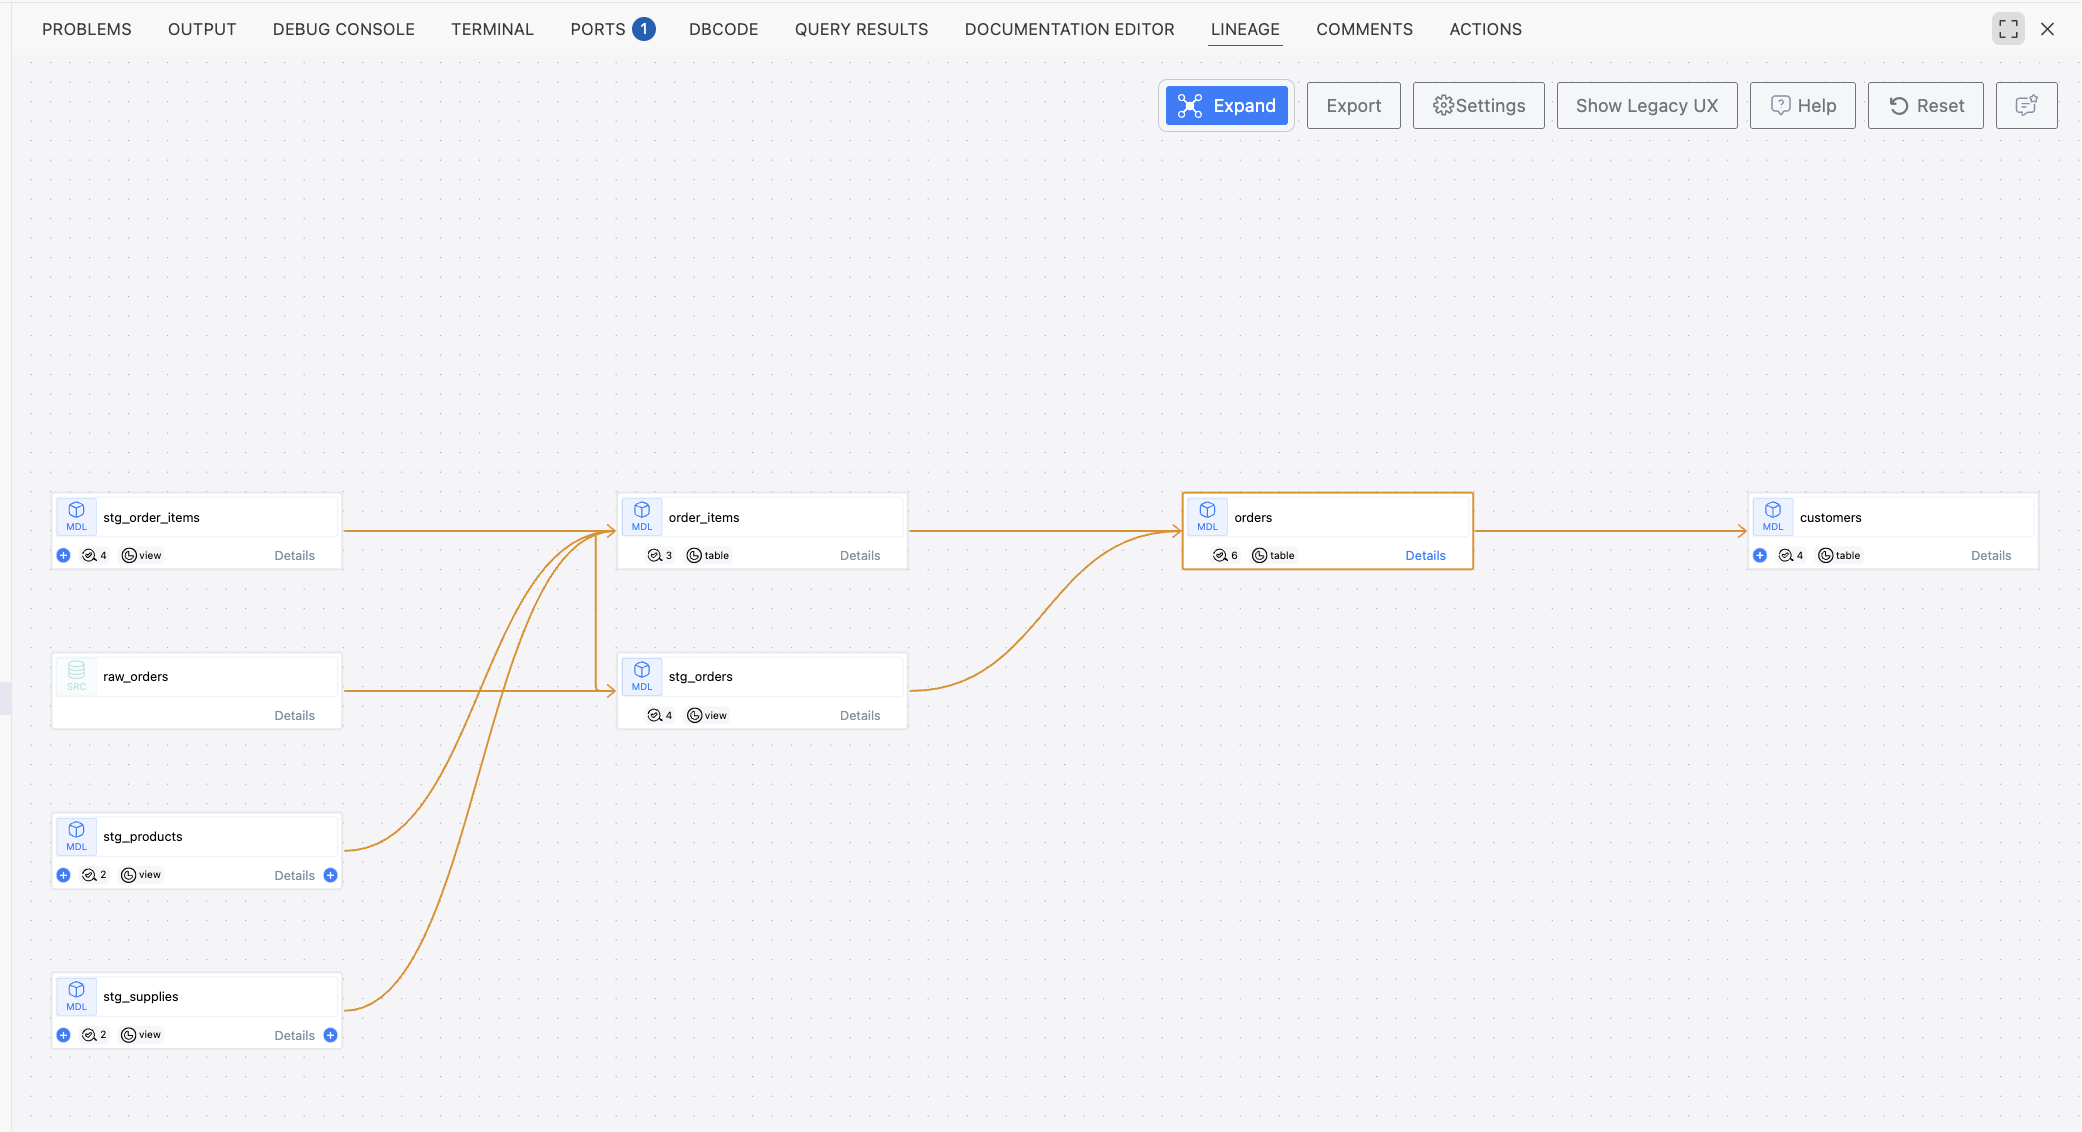
The IDE provides powerful lineage visualization capabilities that help you understand data flow and model dependencies throughout your dbt project.
**To view lineage:**
1. Open any dbt model file in the editor
2. Navigate to the Lineage tab in the IDE interface
3. Explore interactive dependency graphs showing:
* Upstream models and sources feeding into current model
* Downstream models consuming current model output
* Cross-project dependencies and external table references
**Lineage features:**
* **Interactive navigation** - Click nodes to jump between related models
* **Dependency depth control** - Adjust how many levels of dependencies to display
* **Impact analysis** - Understand which models will be affected by changes
* **Visual debugging** - Identify circular dependencies and optimization opportunities
### **Running dbt commands**
Execute dbt commands directly from the IDE for any valid dbt project without leaving your development workspace.
**To run dbt commands:**
Open a dbt project folder in the IDE
Click on the icon from the top-right status bar
```bash theme={null}
# List available dbt environments
ls /root/.venv
# Activate specific dbt version
source /root/.venv/dbt-1.8.9/bin/activate
# Verify dbt installation
dbt --version
```
A command input box will appear, allowing you to enter the desired dbt command
Confirm the command to execute it in the terminal
**Terminal session management:**
If similar commands were executed previously for the same project, the IDE will prompt you to either:
* **Open a new terminal session** - Start a fresh terminal for the command
* **Continue using existing terminal** - Reuse the current terminal session
This integrated feature simplifies the dbt workflow, enabling you to build, test, and manage transformations without leaving your development workspace.
**Example dbt commands:**
```bash theme={null}
# Run all models
dbt run
# Run specific models
dbt run --select staging.stg_customers+
# Test models
dbt test
# Generate documentation
dbt docs generate
# Compile models
dbt compile
```
## Cube development
### **Cube creation**
Create new cubes directly from the IDE without leaving your development environment, providing a seamless and integrated experience for managing cube creation.
**To create a cube:**
Open any file within the cubes repository
Click on the icon located on the top-right corner of the status bar
The Cube Server will automatically start, enabling the cube creation process
A new file tab will open, displaying a list of available schemas. Select the desired schema
Proceed to define and create cubes as needed
This workflow provides a seamless and integrated experience for managing cube creation within the IDE, eliminating the need to switch between different tools or environments.
### **Cube server start**
Start the Cube Server for a specific active file tab directly from the IDE toolbar, giving you full control over active Cube Server sessions.
**To start the Cube Server:**
Open any file within your cubes repository
Click on the icon from the IDE toolbar
Once initiated, the Cube Server will launch and can be accessed locally via `http://localhost:4000`
**Server conflict management:**
If there is an existing Cube Server instance running, a prompt will appear asking you to:
* **Stop the currently active server and start a new one** - Terminate the existing instance and launch a fresh server
* **Cancel to retain the current session** - Keep the existing server running
This ensures that multiple servers do not conflict and that you retain full control over active Cube Server sessions.
## Running Streamlit applications and Python files
### **Running Streamlit applications**
Run Streamlit applications directly from the IDE with automatic environment setup and dependency management.
**To run a Streamlit application:**
Open the `streamlit_app.py` file from the Streamlit repository
Click on the icon in the IDE toolbar
The IDE will prompt you to select the desired Python version for execution
Upon confirmation, a virtual environment will be created automatically
All dependencies listed in the `requirements.txt` file will be installed within the environment
Once setup is complete, the Streamlit application will launch successfully
### **Running Python files**
Execute standalone Python scripts with the same streamlined workflow as Streamlit applications.
**To run a Python file:**
Open any Python file (`.py`) in the IDE
Click on the icon in the IDE toolbar
Choose the desired Python version for execution
A virtual environment will be created automatically if needed
Dependencies from `requirements.txt` will be installed automatically
The Python file will run successfully with output displayed in the terminal
**Benefits of integrated execution:**
* **Environment consistency** - Automatic virtual environment creation ensures consistent execution environments
* **Dependency management** - Automatic installation of dependencies from `requirements.txt` reduces manual setup overhead
* **Version selection** - Choose the appropriate Python version for your project requirements
* **Seamless workflow** - Run applications and scripts without leaving the IDE or switching contexts
This process ensures environment consistency and reduces manual setup overhead for Streamlit or Python-based workflows, allowing you to focus on development rather than environment configuration.
 **Key workflows:**
 **To view lineage:**
1. Open any dbt model file in the editor
2. Navigate to the Lineage tab in the IDE interface
3. Explore interactive dependency graphs showing:
* Upstream models and sources feeding into current model
* Downstream models consuming current model output
* Cross-project dependencies and external table references
**Lineage features:**
* **Interactive navigation** - Click nodes to jump between related models
* **Dependency depth control** - Adjust how many levels of dependencies to display
* **Impact analysis** - Understand which models will be affected by changes
* **Visual debugging** - Identify circular dependencies and optimization opportunities
### **Running dbt commands**
Execute dbt commands directly from the IDE for any valid dbt project without leaving your development workspace.
**To run dbt commands:**
**To view lineage:**
1. Open any dbt model file in the editor
2. Navigate to the Lineage tab in the IDE interface
3. Explore interactive dependency graphs showing:
* Upstream models and sources feeding into current model
* Downstream models consuming current model output
* Cross-project dependencies and external table references
**Lineage features:**
* **Interactive navigation** - Click nodes to jump between related models
* **Dependency depth control** - Adjust how many levels of dependencies to display
* **Impact analysis** - Understand which models will be affected by changes
* **Visual debugging** - Identify circular dependencies and optimization opportunities
### **Running dbt commands**
Execute dbt commands directly from the IDE for any valid dbt project without leaving your development workspace.
**To run dbt commands:**