> ## Documentation Index
> Fetch the complete documentation index at: https://docs.5x.co/llms.txt
> Use this file to discover all available pages before exploring further.
# Setting up the IDE
> Complete guide to setting up your IDE environment with data warehouse credentials and repository configuration
**Focus:** Configure your IDE environment with proper data warehouse connections, repository access, and development tools to start building data applications.
Before you can start developing in the 5X IDE, you need to configure your data warehouse credentials and set up repositories. This guide walks you through the complete setup process for all supported data warehouses and repository types.
**Setup Requirements**
Ensure you have developer access to your 5X platform workspace and appropriate data warehouse privileges before beginning the setup process.
## Prerequisites and access requirements
### **Required platform access**
Before using the 5X IDE, ensure you have the necessary access and permissions:
* **Developer access** to your 5X platform workspace
* **Data warehouse privileges** (BigQuery, Snowflake, Redshift, or PostgreSQL)
* **Git repository access** (if importing existing repositories)
The IDE is particularly powerful for dbt development, Python data applications, and Streamlit dashboards. Understanding your primary use cases will help you configure the environment optimally from the start.
### **Data warehouse requirements**
Different warehouses have specific requirements:
**Google Cloud setup required**
Service account with BigQuery Data Editor role and JSON key file
**Key pair authentication**
Private key and passphrase for secure authentication
**Cluster access**
Cluster endpoint, database credentials, and network access
**Server connection**
Host, port, database name, and authentication credentials
### **Python version requirements**
The IDE comes pre-installed with multiple Python versions managed through pyenv, providing flexibility for different project requirements and dependency compatibility.
**Supported Python versions:**
* **Python 3.8.20** - Extended legacy support for older projects
* **Python 3.9.23** - Legacy support for older projects
* **Python 3.10.18** - Stable version with good package compatibility
* **Python 3.11.13** - Default version (set by PYENV\_VERSION)
* **Python 3.12.11** - Latest stable with performance improvements
* **Python 3.13.4** - Cutting-edge features and optimizations
These versions are automatically available in your IDE environment. You can switch between versions when creating virtual environments or running Python applications.
### **dbt version requirements**
The IDE supports multiple dbt versions to accommodate different project requirements and compatibility needs.
**Supported dbt versions:**
* **dbt 1.6.18** - Legacy support for older projects
* **dbt 1.7.19** - Stable version with broad compatibility
* **dbt 1.8.9** - Current stable version
* **dbt 1.9.10** - Latest features and improvements
These versions are available when configuring data warehouse credentials. Select the appropriate version based on your dbt project requirements and compatibility needs.
## Credential configuration
### **Accessing credential settings**
Navigate to the IDE credential configuration:
Access **Settings** from the main navigation in your 5X platform
Click on **IDE** in the settings menu, then select **Credentials**
Click **Add New Credential** against IDE to start the configuration wizard
### **Data warehouse setup examples**
The IDE supports multiple data warehouses. Choose the setup process for your specific warehouse:
**Google BigQuery setup**
For BigQuery users, you'll need to create a service account with appropriate permissions:
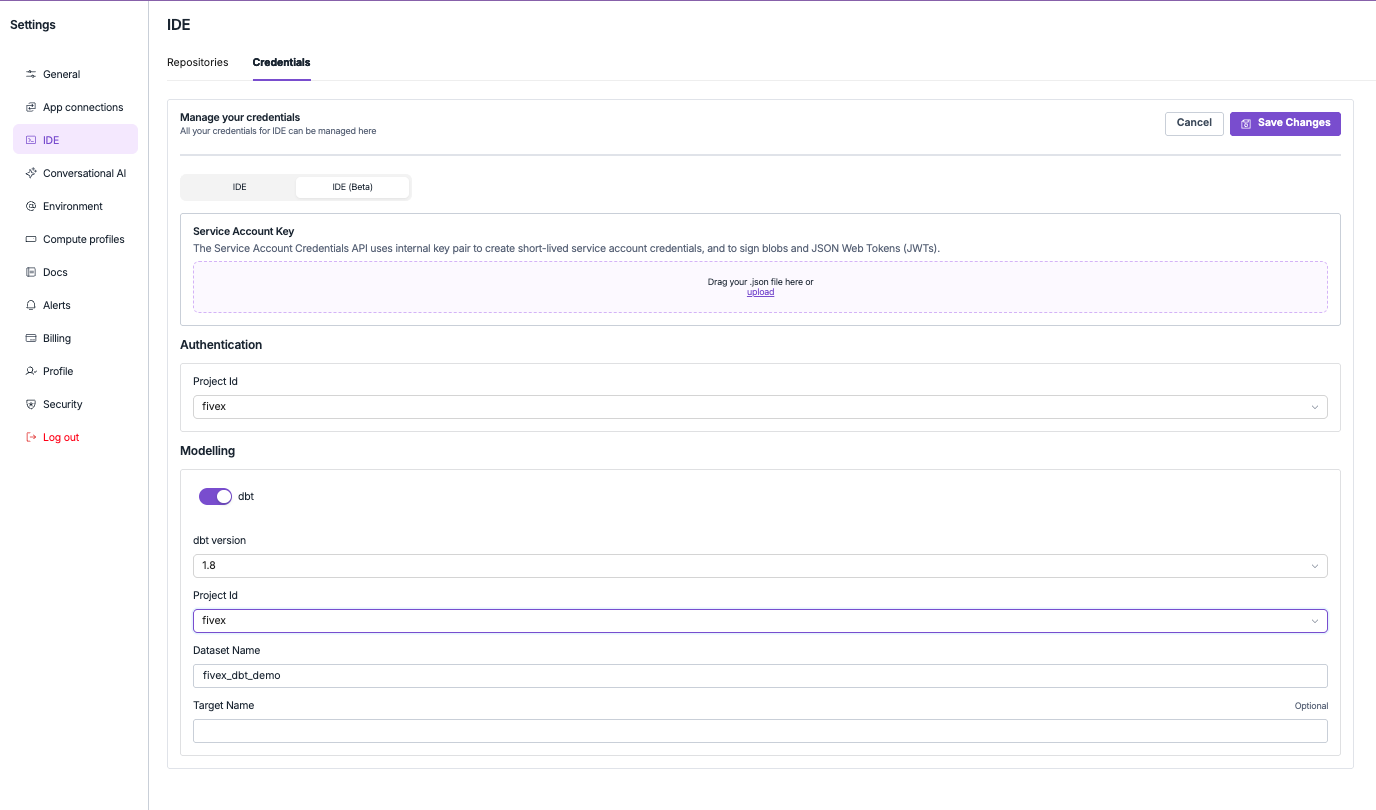 Access Google Cloud Console → IAM & Admin → Create service account (e.g., "5x-ide-dev-account")
Assign the **BigQuery Data Editor** role for optimal functionality and security
Create and download the JSON key file for the service account
Upload the key file through the 5X credential interface
**Configuration fields:**
* **Service Account Key**: Upload your JSON key file
* **Project ID**: Your BigQuery project identifier
* **dbt Version**: Choose from available versions (1.6.18, 1.7.19, 1.8.9, 1.9.10)
* **Dataset Name**: Target dataset for development workloads
* **Target Name**: Optional custom target name for dbt profile
**Permission scope options:**
* **Project-level**: Access across all datasets (recommended for development)
* **Dataset-level**: Granular access control for sensitive data environments
**Snowflake setup**
Configure Snowflake credentials using key pair authentication:
Access Google Cloud Console → IAM & Admin → Create service account (e.g., "5x-ide-dev-account")
Assign the **BigQuery Data Editor** role for optimal functionality and security
Create and download the JSON key file for the service account
Upload the key file through the 5X credential interface
**Configuration fields:**
* **Service Account Key**: Upload your JSON key file
* **Project ID**: Your BigQuery project identifier
* **dbt Version**: Choose from available versions (1.6.18, 1.7.19, 1.8.9, 1.9.10)
* **Dataset Name**: Target dataset for development workloads
* **Target Name**: Optional custom target name for dbt profile
**Permission scope options:**
* **Project-level**: Access across all datasets (recommended for development)
* **Dataset-level**: Granular access control for sensitive data environments
**Snowflake setup**
Configure Snowflake credentials using key pair authentication:
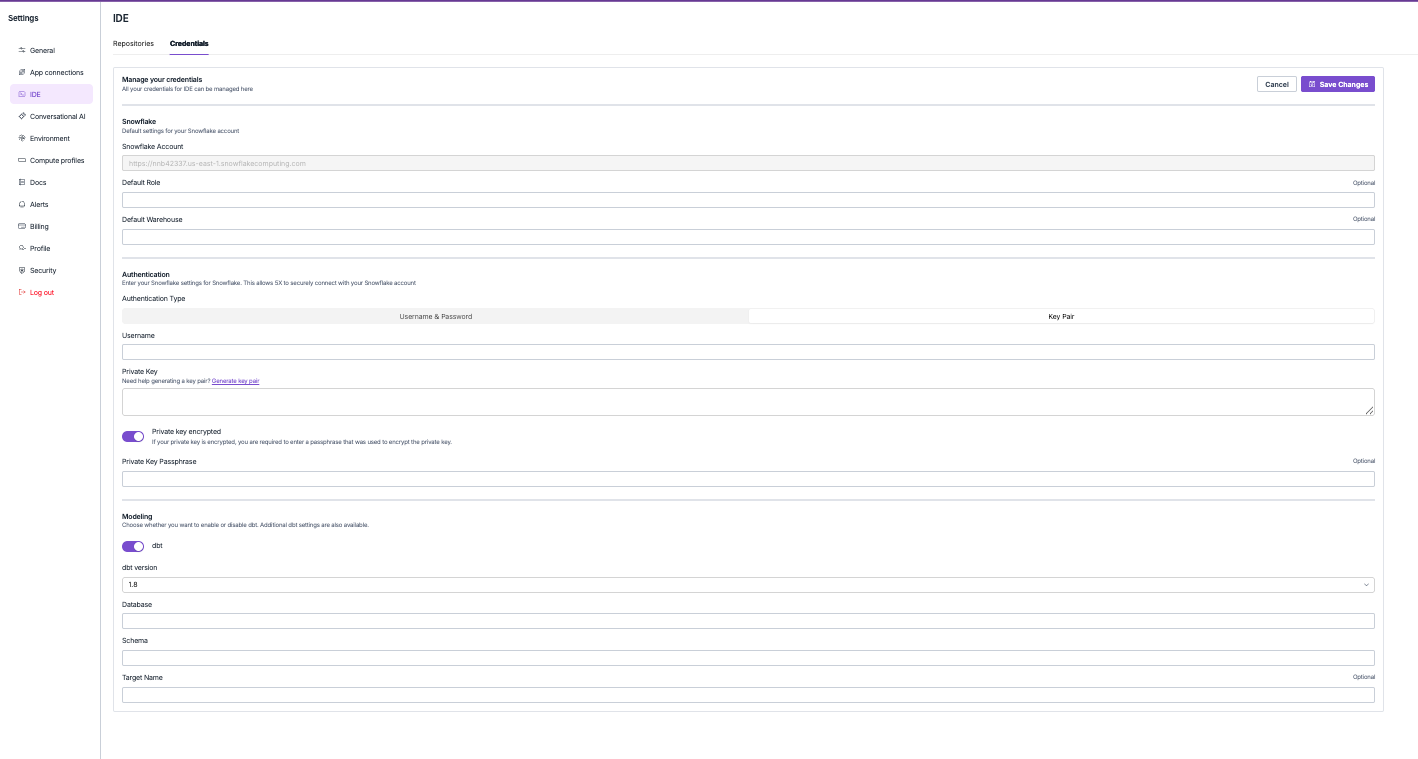 Enter your Snowflake account URL and default role/warehouse
Generate a key pair and configure private key authentication
Enable dbt and set version, database, and schema preferences
Test connection and save your Snowflake credentials
**Configuration fields:**
* **Snowflake Account**: Your Snowflake account URL
* **Default Role**: Optional default role for connections
* **Default Warehouse**: Optional default warehouse for queries
* **Username**: Your Snowflake username
* **Private Key**: Upload or paste your private key
* **Private Key Passphrase**: Optional passphrase if key is encrypted
* **dbt Version**: Choose from available versions (1.6.18, 1.7.19, 1.8.9, 1.9.10)
* **Database**: Target database for dbt models
* **Schema**: Target schema for dbt models
**Amazon Redshift setup**
Configure Redshift connection with username/password authentication:
Enter your Snowflake account URL and default role/warehouse
Generate a key pair and configure private key authentication
Enable dbt and set version, database, and schema preferences
Test connection and save your Snowflake credentials
**Configuration fields:**
* **Snowflake Account**: Your Snowflake account URL
* **Default Role**: Optional default role for connections
* **Default Warehouse**: Optional default warehouse for queries
* **Username**: Your Snowflake username
* **Private Key**: Upload or paste your private key
* **Private Key Passphrase**: Optional passphrase if key is encrypted
* **dbt Version**: Choose from available versions (1.6.18, 1.7.19, 1.8.9, 1.9.10)
* **Database**: Target database for dbt models
* **Schema**: Target schema for dbt models
**Amazon Redshift setup**
Configure Redshift connection with username/password authentication:
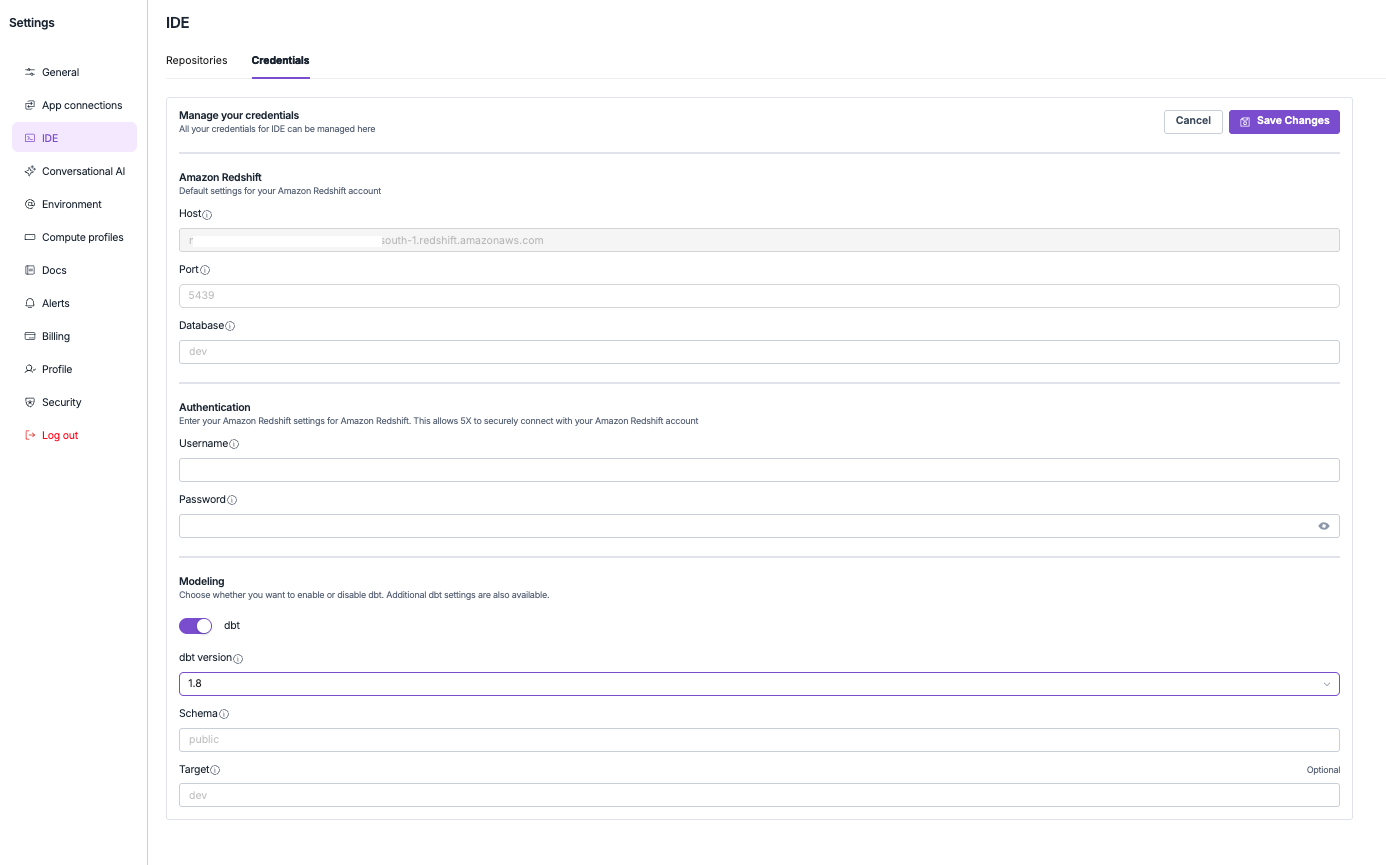 Enter your Redshift cluster host, port, and database information
Provide username and password for database access
Enable dbt and configure version, schema, and target settings
Validate connection and save your Redshift credentials
**Configuration fields:**
* **Host**: Your Redshift cluster endpoint
* **Port**: Database port (default 5439)
* **Database**: Target database name
* **Username**: Database username
* **Password**: Database password
* **dbt Version**: Choose from available versions (1.6.18, 1.7.19, 1.8.9, 1.9.10)
* **Schema**: Target schema for dbt models
* **Target**: Optional target environment name
**PostgreSQL setup**
Configure PostgreSQL connection for local or cloud instances:
Enter your Redshift cluster host, port, and database information
Provide username and password for database access
Enable dbt and configure version, schema, and target settings
Validate connection and save your Redshift credentials
**Configuration fields:**
* **Host**: Your Redshift cluster endpoint
* **Port**: Database port (default 5439)
* **Database**: Target database name
* **Username**: Database username
* **Password**: Database password
* **dbt Version**: Choose from available versions (1.6.18, 1.7.19, 1.8.9, 1.9.10)
* **Schema**: Target schema for dbt models
* **Target**: Optional target environment name
**PostgreSQL setup**
Configure PostgreSQL connection for local or cloud instances:
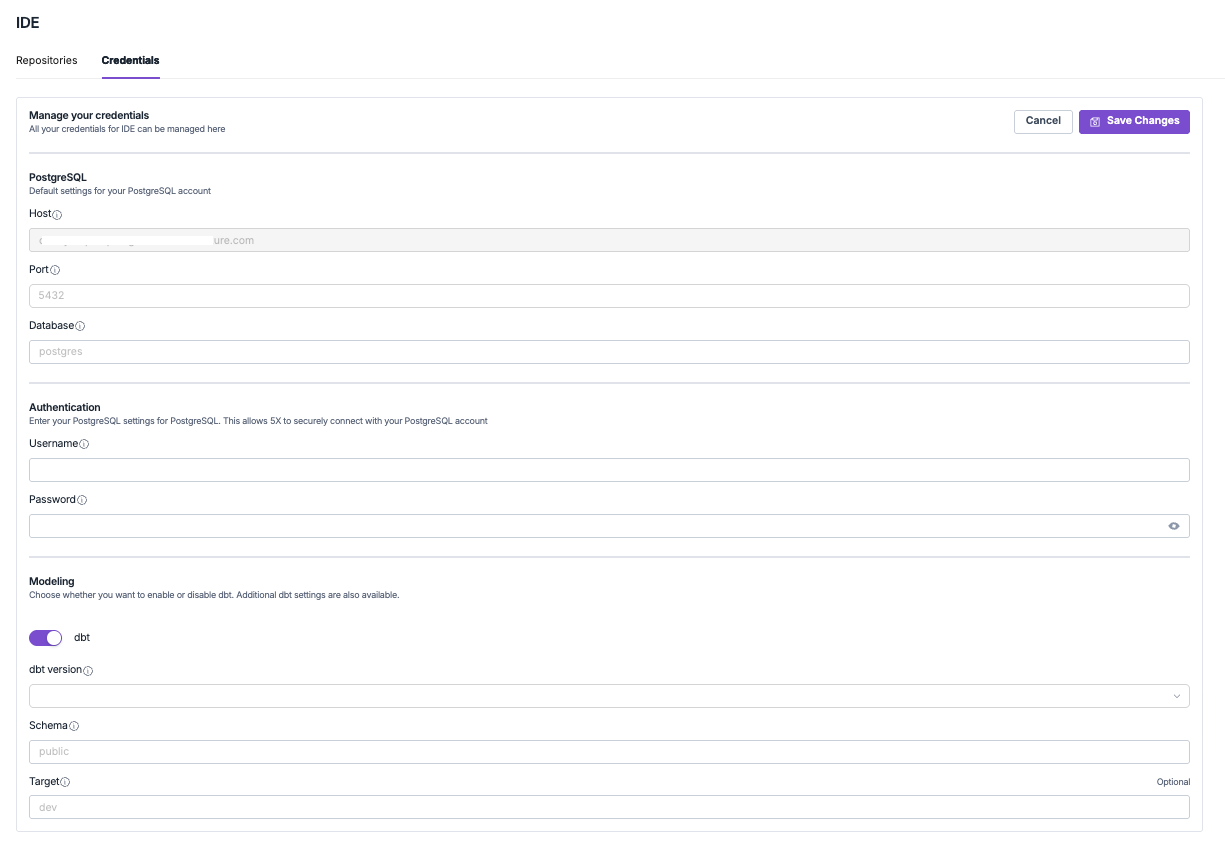 Enter your PostgreSQL host, port, and database information
Provide username and password for database access
Enable dbt and configure version, schema, and target settings
Validate connection and save your PostgreSQL credentials
**Configuration fields:**
* **Host**: Your PostgreSQL server endpoint
* **Port**: Database port (default 5432)
* **Database**: Target database name
* **Username**: Database username
* **Password**: Database password
* **dbt Version**: Choose from available versions (1.6.18, 1.7.19, 1.8.9, 1.9.10)
* **Schema**: Target schema for dbt models
* **Target**: Optional target environment name
## Repository management
### **Repository integration benefits**
The 5X platform maintains a registry of repositories accessible within your IDE environment. This integration enables advanced features like automatic lineage tracking, integrated documentation, and seamless deployment workflows.
**Key benefits of integration:**
* **Automatic metadata extraction** and dependency tracking
* **Consistent repository access** across your workspace
* **Seamless deployment workflows** to production environments
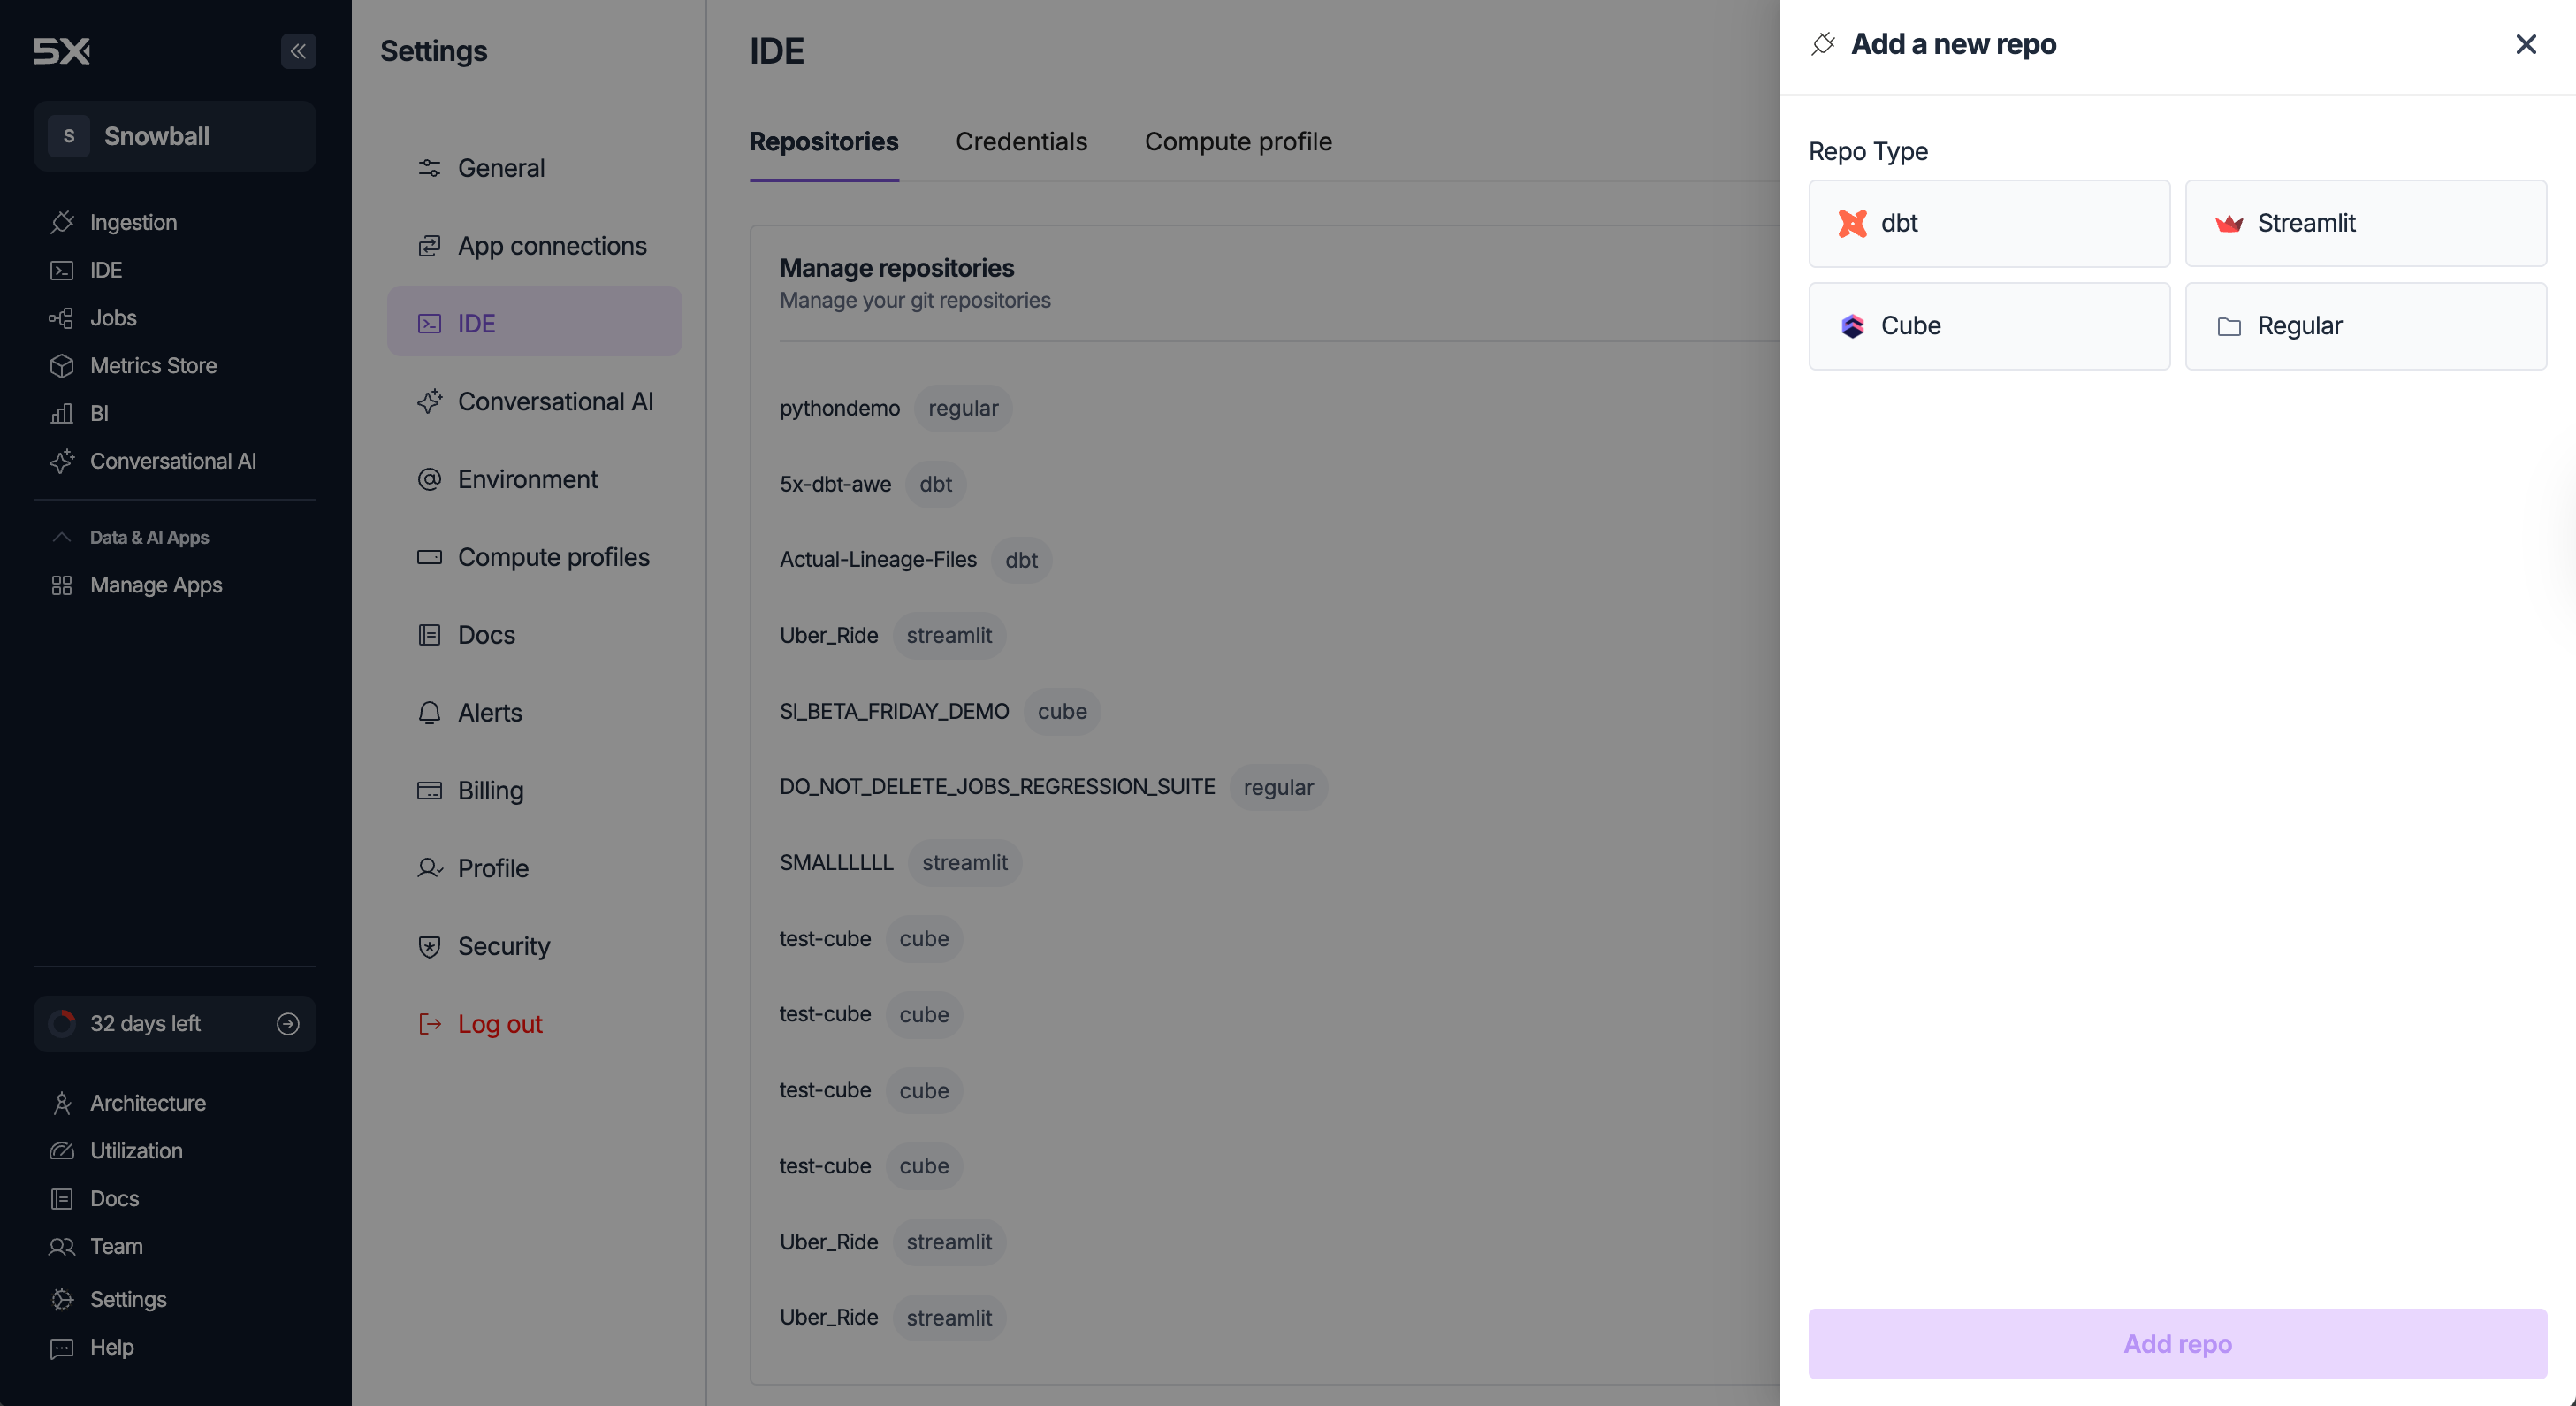
### **Creating new repositories**
Navigate to **Settings → IDE → Repositories → New Repository** to access the repository configuration interface:
Enter your PostgreSQL host, port, and database information
Provide username and password for database access
Enable dbt and configure version, schema, and target settings
Validate connection and save your PostgreSQL credentials
**Configuration fields:**
* **Host**: Your PostgreSQL server endpoint
* **Port**: Database port (default 5432)
* **Database**: Target database name
* **Username**: Database username
* **Password**: Database password
* **dbt Version**: Choose from available versions (1.6.18, 1.7.19, 1.8.9, 1.9.10)
* **Schema**: Target schema for dbt models
* **Target**: Optional target environment name
## Repository management
### **Repository integration benefits**
The 5X platform maintains a registry of repositories accessible within your IDE environment. This integration enables advanced features like automatic lineage tracking, integrated documentation, and seamless deployment workflows.
**Key benefits of integration:**
* **Automatic metadata extraction** and dependency tracking
* **Consistent repository access** across your workspace
* **Seamless deployment workflows** to production environments
### **Creating new repositories**
Navigate to **Settings → IDE → Repositories → New Repository** to access the repository configuration interface:
 ### **Repository types and templates**
Choose the right template for your development needs:
**Data transformation projects**
Pre-configured dbt project structure with sample models, tests, and documentation templates. Includes properly configured dbt\_project.yml and basic macros.
**Interactive applications**
Basic Streamlit template with sample visualizations for data apps. Ready-to-use dashboard components and data visualization examples.
**Metrics projects**
Pre-configured Cube project structure with sample data models, schema files, and caching setup. Defines measures, dimensions, and pre-aggregations for building a consistent Metrics project.
**Custom development**
Maximum flexibility for Python applications or mixed-technology projects. Complete control over project organization and structure.
### **Repository management options**
**Fully managed Git repository**
Creates a fully managed Git repository within your 5X workspace:
* **Automatic backup** and integrated version control
* **Seamless integration** with all 5X platform features
* **Platform handles** repository maintenance and access control
* **No external Git provider** required
**Best for:** New projects, teams wanting integrated workflows, simplified repository management
**Connect external repositories**
Connects external repositories while maintaining external Git provider relationships:
* **Requires SSH URL** to existing repository
* **Supports public and private** repositories with proper authentication
* **Maintains connection** to GitHub, GitLab, Bitbucket, etc.
* **Full Git workflow** preserved with external provider
**Best for:** Existing projects, teams using external Git providers, maintaining current workflows
### **Repository setup process**
Select from dbt, cube, general purpose, or Streamlit repository templates based on your project needs
Choose between 5X managed repository or import existing repository
For existing repositories, provide SSH URL and configure authentication
Follow the configuration wizard to create your repository
Confirm repository appears in your IDE file explorer
**Critical integration note**
Always create repositories through **Settings → IDE → Repositories** rather than using Git commands directly in the IDE terminal. Repositories created directly within the IDE won't appear automatically in your 5X workspace registry.
## Environment validation
### **Testing your setup**
After configuring credentials and repositories, validate your setup:
Use the database explorer to verify you can connect to your warehouse
Confirm repositories appear in the IDE file explorer
Run a simple dbt command to verify dbt is properly configured
Verify Python versions and virtual environment creation works
### **Common setup issues**
**Troubleshooting credential issues:**
* **Verify service account permissions** for BigQuery users
* **Check private key format** for Snowflake users
* **Confirm network access** for Redshift/PostgreSQL
* **Validate authentication credentials** for all warehouse types
**Repository integration issues:**
* **Ensure repository created through Settings** interface
* **Check SSH key configuration** for external repositories
* **Verify repository permissions** and access rights
* **Confirm repository URL** is correct and accessible
**dbt configuration problems:**
* **Verify credential configuration** matches dbt profile requirements
* **Check target dataset/schema** exists and has write permissions
* **Confirm dbt version** is compatible with your warehouse
* **Review dbt logs** for specific error messages
## Next steps
Once your IDE is properly configured, you're ready to start developing:
**Learn the interface**
Navigate the IDE interface and understand core components for efficient development.
**Start developing**
Learn how to build dbt models, Python applications, and Streamlit dashboards.
### **Repository types and templates**
Choose the right template for your development needs:
**Data transformation projects**
Pre-configured dbt project structure with sample models, tests, and documentation templates. Includes properly configured dbt\_project.yml and basic macros.
**Interactive applications**
Basic Streamlit template with sample visualizations for data apps. Ready-to-use dashboard components and data visualization examples.
**Metrics projects**
Pre-configured Cube project structure with sample data models, schema files, and caching setup. Defines measures, dimensions, and pre-aggregations for building a consistent Metrics project.
**Custom development**
Maximum flexibility for Python applications or mixed-technology projects. Complete control over project organization and structure.
### **Repository management options**
**Fully managed Git repository**
Creates a fully managed Git repository within your 5X workspace:
* **Automatic backup** and integrated version control
* **Seamless integration** with all 5X platform features
* **Platform handles** repository maintenance and access control
* **No external Git provider** required
**Best for:** New projects, teams wanting integrated workflows, simplified repository management
**Connect external repositories**
Connects external repositories while maintaining external Git provider relationships:
* **Requires SSH URL** to existing repository
* **Supports public and private** repositories with proper authentication
* **Maintains connection** to GitHub, GitLab, Bitbucket, etc.
* **Full Git workflow** preserved with external provider
**Best for:** Existing projects, teams using external Git providers, maintaining current workflows
### **Repository setup process**
Select from dbt, cube, general purpose, or Streamlit repository templates based on your project needs
Choose between 5X managed repository or import existing repository
For existing repositories, provide SSH URL and configure authentication
Follow the configuration wizard to create your repository
Confirm repository appears in your IDE file explorer
**Critical integration note**
Always create repositories through **Settings → IDE → Repositories** rather than using Git commands directly in the IDE terminal. Repositories created directly within the IDE won't appear automatically in your 5X workspace registry.
## Environment validation
### **Testing your setup**
After configuring credentials and repositories, validate your setup:
Use the database explorer to verify you can connect to your warehouse
Confirm repositories appear in the IDE file explorer
Run a simple dbt command to verify dbt is properly configured
Verify Python versions and virtual environment creation works
### **Common setup issues**
**Troubleshooting credential issues:**
* **Verify service account permissions** for BigQuery users
* **Check private key format** for Snowflake users
* **Confirm network access** for Redshift/PostgreSQL
* **Validate authentication credentials** for all warehouse types
**Repository integration issues:**
* **Ensure repository created through Settings** interface
* **Check SSH key configuration** for external repositories
* **Verify repository permissions** and access rights
* **Confirm repository URL** is correct and accessible
**dbt configuration problems:**
* **Verify credential configuration** matches dbt profile requirements
* **Check target dataset/schema** exists and has write permissions
* **Confirm dbt version** is compatible with your warehouse
* **Review dbt logs** for specific error messages
## Next steps
Once your IDE is properly configured, you're ready to start developing:
**Learn the interface**
Navigate the IDE interface and understand core components for efficient development.
**Start developing**
Learn how to build dbt models, Python applications, and Streamlit dashboards.