> ## Documentation Index
> Fetch the complete documentation index at: https://docs.5x.co/llms.txt
> Use this file to discover all available pages before exploring further.
# Steps 1-3: Account Setup and Workspace Provisioning
> Complete your initial setup from account creation to workspace provisioning
**Estimated Time:** 10-12 minutes
Complete your initial setup from account creation through workspace provisioning in one comprehensive workflow.
## Setup overview
This combined setup process will take you through three essential steps:
1. **Create your 5X account** (\~2 minutes)
2. **Personal and workspace setup** (\~2 minutes)
3. **Configure data warehouse and workspace provisioning** (\~5-7 minutes)
***
## Step 1: Create your 5X account
**Account access:** 5X provides private signup links to new customers. You'll receive a personalized signup link from the 5X team to create your account.
**Need a signup link?** Contact your 5X sales representative or reach out to [support@5x.co](mailto:support@5x.co) to get started with your new account and workspace setup.
### Account creation options
The 5X Platform offers two convenient ways to create your account using your business email through the private signup link:
**Best for:** Direct registration with corporate credentials
* Use your business email address
* Create a secure password
* Email verification required
**Best for:** Quick setup with existing Google Workspace accounts
* One-click authentication with Google
* Use your business Google account
* Automatic email verification
* Secure OAuth integration
### Account creation process
1. **Access the private signup link**
* Use the private signup link provided by the 5X team
* You'll see the "Sign up on 5X" page with registration options
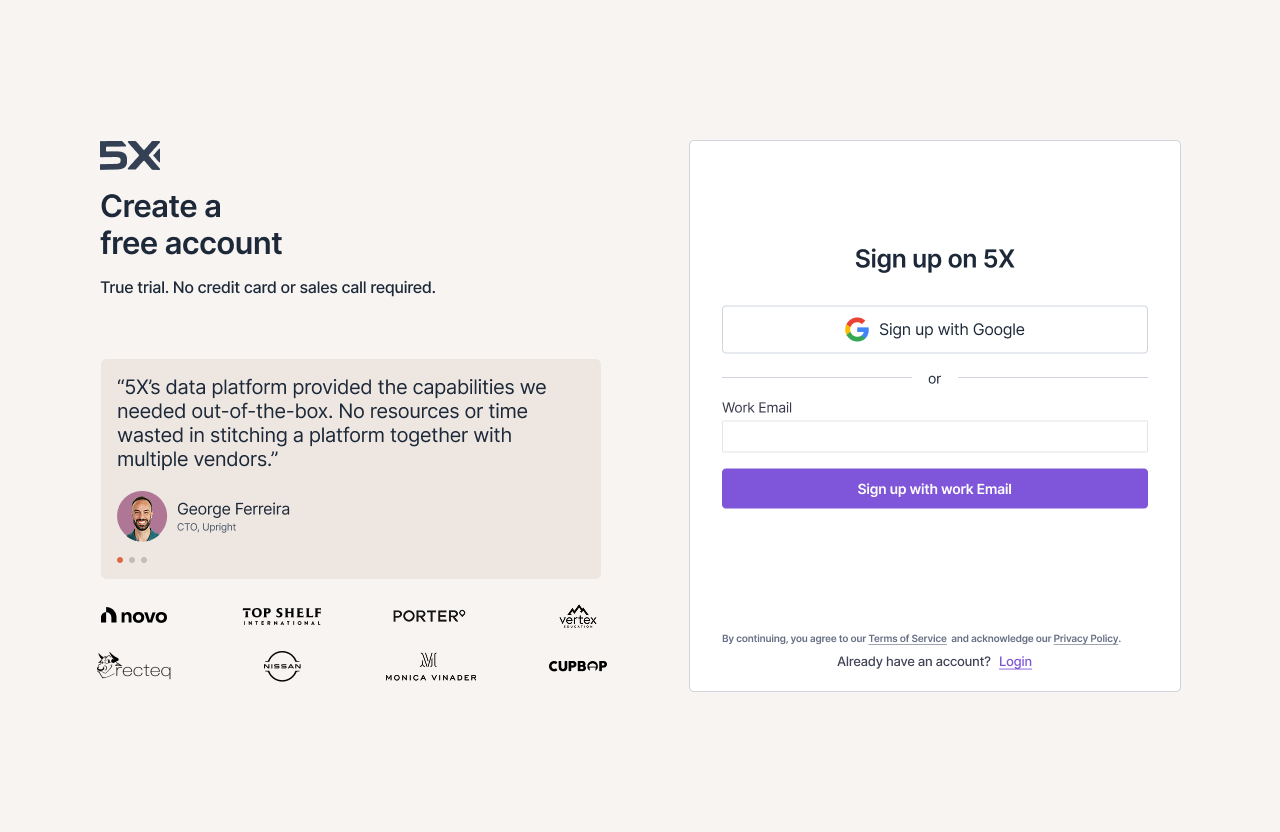 2. **Choose your registration method**
**For Google authentication:**
* Click **"Sign up with Google"** button
* Select your business Google account
* Grant necessary permissions
* Email automatically verified
**For corporate email:**
* Click **"Or sign up with email"**
* Enter your work email address in the "Work Email" field
* Click **"Sign up with email"** button
3. **Email verification** (corporate email only)
* Check your inbox for verification email
* Click the verification link. You'll be redirected back to the platform. Complete the signup process.
***
## Step 2: Personal and workspace setup
Once your account is verified, you'll complete two quick setup forms.
### Personal information
Complete your profile with the "Let's get to know you" form:
1. **Enter your name** in the "What should we call you?" field
2. **Set a secure password** that meets the displayed requirements
3. Click **"Continue"** when all checkmarks are green
### Workspace setup
Configure your workspace with the "Setup your first workspace" form:
2. **Choose your registration method**
**For Google authentication:**
* Click **"Sign up with Google"** button
* Select your business Google account
* Grant necessary permissions
* Email automatically verified
**For corporate email:**
* Click **"Or sign up with email"**
* Enter your work email address in the "Work Email" field
* Click **"Sign up with email"** button
3. **Email verification** (corporate email only)
* Check your inbox for verification email
* Click the verification link. You'll be redirected back to the platform. Complete the signup process.
***
## Step 2: Personal and workspace setup
Once your account is verified, you'll complete two quick setup forms.
### Personal information
Complete your profile with the "Let's get to know you" form:
1. **Enter your name** in the "What should we call you?" field
2. **Set a secure password** that meets the displayed requirements
3. Click **"Continue"** when all checkmarks are green
### Workspace setup
Configure your workspace with the "Setup your first workspace" form:
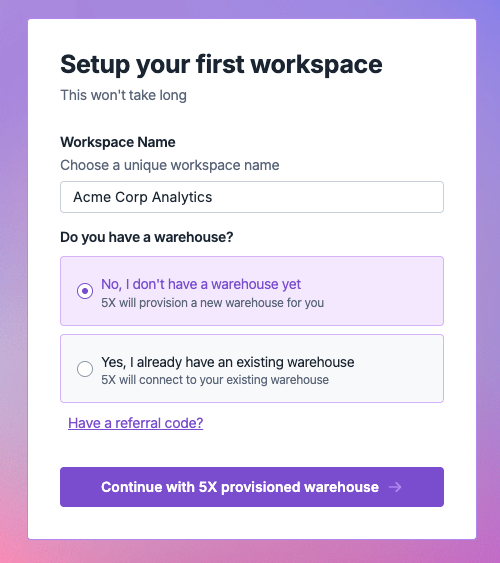 1. **Enter a workspace name** (e.g., "Acme Corp Analytics")
2. **Choose your warehouse option:**
* **"No, I don't have a warehouse yet"** - 5X will create one for you (recommended)
* **"Yes, I already have an existing warehouse"** - Connect your existing warehouse
3. **Add referral code** (optional)
4. Click **"Continue with 5X provisioned warehouse"**
***
## Step 3: Configure data warehouse and workspace provisioning
Choose your data storage solution based on your organization's needs. After configuration, your workspace will be automatically provisioned.
### Warehouse options
**Recommended for quick evaluations and for users who don't yet have a warehouse set up**
* Fully managed and optimized
* No setup complexity
* Automatic scaling
* Built-in security
**For organizations with existing infrastructure**
* Connect Snowflake, Google BigQuery, AWS Redshift, or PostgreSQL
* Maintain existing investments
* Custom configurations
### Option A: 5X managed warehouse setup
1. **Configure your warehouse settings**
* You'll see the "Setup your warehouse" screen
1. **Enter a workspace name** (e.g., "Acme Corp Analytics")
2. **Choose your warehouse option:**
* **"No, I don't have a warehouse yet"** - 5X will create one for you (recommended)
* **"Yes, I already have an existing warehouse"** - Connect your existing warehouse
3. **Add referral code** (optional)
4. Click **"Continue with 5X provisioned warehouse"**
***
## Step 3: Configure data warehouse and workspace provisioning
Choose your data storage solution based on your organization's needs. After configuration, your workspace will be automatically provisioned.
### Warehouse options
**Recommended for quick evaluations and for users who don't yet have a warehouse set up**
* Fully managed and optimized
* No setup complexity
* Automatic scaling
* Built-in security
**For organizations with existing infrastructure**
* Connect Snowflake, Google BigQuery, AWS Redshift, or PostgreSQL
* Maintain existing investments
* Custom configurations
### Option A: 5X managed warehouse setup
1. **Configure your warehouse settings**
* You'll see the "Setup your warehouse" screen
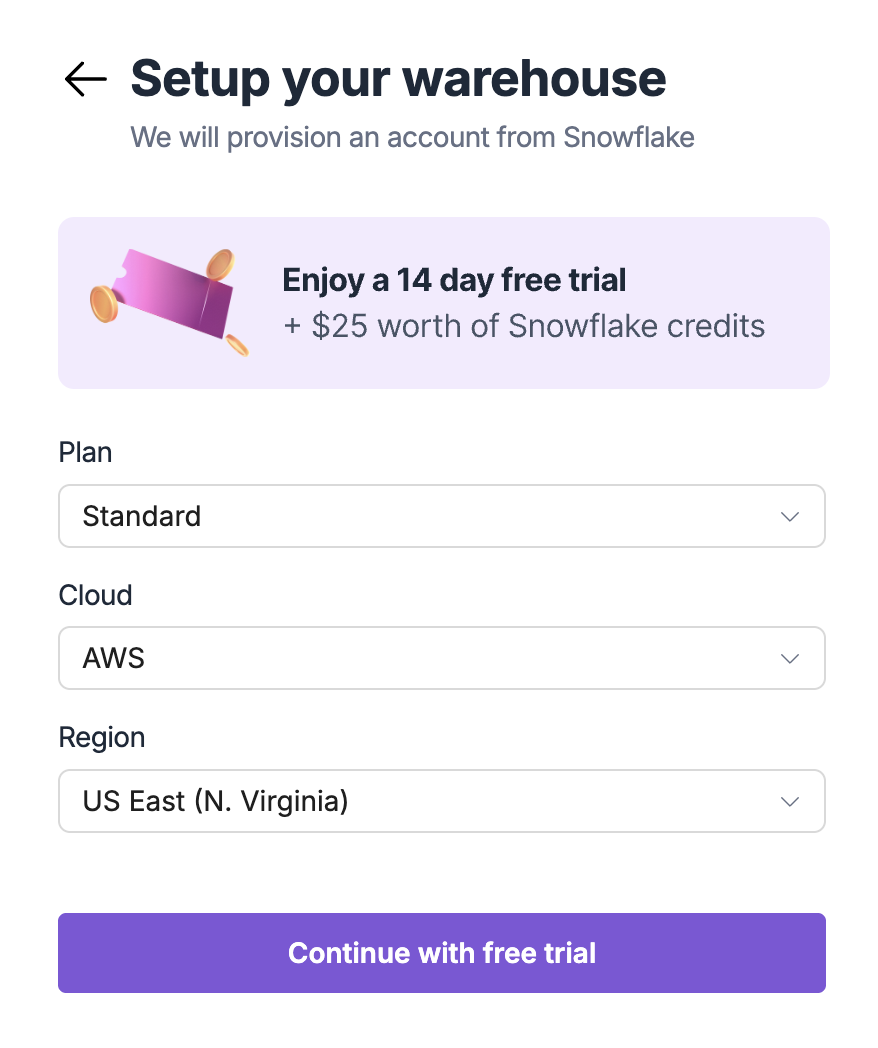 2. **Select your configuration**
* **Plan:** Choose from available plans (Standard is pre-selected)
* **Cloud:** Select your preferred cloud provider (AWS, GCP, or Azure)
* **Region:** Choose the region closest to your users for optimal performance
3. **Complete setup and begin provisioning**
* Review your selections
* Click **"Continue with free trial"** to proceed
* Your workspace with a 5X managed snowflake warehouse will be provisioned. The provisioning process will take around 5 minutes.
### Option B: Connect existing warehouse
1. **Select your warehouse type**
Enterprise cloud data warehouse
Google Cloud serverless warehouse
Amazon cloud data warehouse
Open source relational database
2. **Enter connection details**
**Step 1: Prerequisites**
Before proceeding, ensure you have:
1. **Required Snowflake roles:** ACCOUNTADMIN, SECURITYADMIN, and SYSADMIN
2. **Network access:** If you have network policies on your Snowflake account, allowlist these static IPs:
```
35.236.200.239/32
35.230.162.249/32
```
**Step 2: Create Snowflake user & role for 5X**
Create a SQL file and run the following script in your Snowflake console:
```sql theme={null}
begin;
-- create variables for user / password / role / warehouse / database (needs to be uppercase for objects)
set role_name = 'FIVEX_ROLE';
set user_name = 'FIVEX_USER';
set user_password = 'yourpassword';
set warehouse_name = 'FIVEX_WAREHOUSE';
-- change role to securityadmin for user / role steps
use role securityadmin;
-- create role for fivex
create role if not exists identifier($role_name);
grant role identifier($role_name) to role SYSADMIN;
-- create a user for fivex
create user if not exists identifier($user_name)
password = $user_password
default_role = $role_name
default_warehouse = $warehouse_name;
grant role identifier($role_name) to user identifier($user_name);
-- set binary_input_format to BASE64
ALTER USER identifier($user_name) SET BINARY_INPUT_FORMAT = 'BASE64';
-- change role to sysadmin for warehouse / database steps
use role sysadmin;
-- create a warehouse for fivex (optional)
create warehouse if not exists identifier($warehouse_name)
warehouse_size = xsmall
warehouse_type = standard
auto_suspend = 60
auto_resume = true
initially_suspended = true;
-- grant fivex role access to warehouse
grant USAGE
on warehouse identifier($warehouse_name)
to role identifier($role_name);
--grant fivex access to users and roles for team management
use role ACCOUNTADMIN;
grant create user on account to role identifier($role_name);
grant create role on account to role identifier($role_name);
grant manage grants on account to role identifier($role_name);
-- change role to ACCOUNTADMIN for utilization & audit logs related steps
grant IMPORTED PRIVILEGES on database SNOWFLAKE to role identifier($role_name);
use role sysadmin;
commit;
```
**Important:** Replace 'yourpassword' in the script above with a strong, secure password. You can customize names, but we recommend keeping FIVEX\_USER, FIVEX\_ROLE and FIVEX\_WAREHOUSE.
**Step 3: Upload authentication key pair**
For secure key-pair authentication:
1. Generate a private/public key pair (if not already done)
2. In the 5X platform, enter:
* **Account URL:** `https://account_name.region.snowflakecomputing.com`
* **Username:** `FIVEX_USER` (or your custom username)
* **Private Key:** Paste your private key content
* **Passphrase:** Only required if your private key is encrypted
3. Run this script to update the RSA public key in Snowflake:
```sql theme={null}
ALTER USER SET RSA_PUBLIC_KEY = '';
```
**Step 4: Enter connection details**
Complete the connection form with your existing Snowflake configuration:
* **Default Warehouse:** `FIVEX_WAREHOUSE` (or your custom warehouse name)
* **Default Role:** `FIVEX_ROLE` (or your custom role name)
* **Plan:** Enter your current Snowflake plan/edition
* **Cloud:** Specify your existing cloud provider (AWS, GCP, or Azure)
* **Region:** Enter the region where your Snowflake account is hosted
**Step 1: Pre-requisites**
1. Log in to AWS Console
2. Navigate to Amazon Redshift
3. Select your cluster and copy the Endpoint URL (without jdbc:redshift:// prefix)
```
http://cluster-name.account-id.region.redshift.amazonaws.com
```
4. Database name is the initial database created with your cluster. You can find this information in your cluster configuration.
5. Use username and password authentication for database access. Ensure the user has appropriate permissions for your use case.
6. (Optional) Run on Amazon Redshift SQL editor for connection details.
```sql theme={null}
begin;
-- Create variables (for reference; Redshift doesn’t support SQL variables directly)
-- user_name = 'FIVEX_USER';
-- user_password = 'yourpassword';
-- database_name = 'FIVEX_DATABASE';
-- schema_name = 'FIVEX_SCHEMA';
-- Create a user
CREATE USER FIVEX_USER PASSWORD 'yourpassword';
-- Create a database (optional)
CREATE DATABASE FIVEX_DATABASE;
-- Grant DB-level permissions
GRANT CREATE ON DATABASE FIVEX_DATABASE TO FIVEX_USER;
GRANT TEMPORARY ON DATABASE FIVEX_DATABASE TO FIVEX_USER;
-- Create schema
CREATE SCHEMA IF NOT EXISTS FIVEX_SCHEMA;
-- Grant schema-level permissions
GRANT ALL ON SCHEMA FIVEX_SCHEMA TO FIVEX_USER;
GRANT ALL PRIVILEGES ON ALL TABLES IN SCHEMA FIVEX_SCHEMA TO FIVEX_USER;
-- Grant access to system catalogs
GRANT USAGE ON SCHEMA information_schema TO FIVEX_USER;
GRANT SELECT ON ALL TABLES IN SCHEMA information_schema TO FIVEX_USER;
GRANT USAGE ON SCHEMA pg_catalog TO FIVEX_USER;
GRANT SELECT ON ALL TABLES IN SCHEMA pg_catalog TO FIVEX_USER;
-- Grant access to all schemas
GRANT USAGE ON ALL SCHEMAS IN DATABASE FIVEX_DATABASE TO FIVEX_USER;
GRANT SELECT ON ALL TABLES IN DATABASE FIVEX_DATABASE TO FIVEX_USER;
-- Set default privileges in FIVEX schema
ALTER DEFAULT PRIVILEGES IN SCHEMA FIVEX_SCHEMA
GRANT ALL ON TABLES TO FIVEX_USER;
-- Set default privileges in public schema
ALTER DEFAULT PRIVILEGES IN SCHEMA public
GRANT SELECT ON TABLES TO FIVEX_USER;
-- Grant execute on functions
GRANT EXECUTE ON ALL FUNCTIONS IN SCHEMA public TO FIVEX_USER;
GRANT EXECUTE ON ALL FUNCTIONS IN SCHEMA FIVEX_SCHEMA TO FIVEX_USER;
commit;
```
**Step 2: Basic connection information**
1. Enter 'Host' & 'Port' details
2. Enter 'Database' name
3. Enter 'Username' & 'Password'
4. Select 'Cluster Region'
5. Click on 'Next step' to proceed
**Step 3: Security and Network configuration**
1. Go to AWS Console > VPC > Security Groups
2. Find your Redshift cluster's security group and Edit inbound rules
3. Add a new rule for each IP with Port 5439
```
35.236.200.239/32
35.230.162.249/32
```
4. Database name is the initial database created with your cluster. You can find this information in your cluster configuration.
5. If your cluster is in a VPC, also ensure:
* Subnet is properly configured
* Route tables allow internet access
* DNS resolution is enabled
**Step 1: Pre-requisites**
1. Open port 5432 (or your custom port) in your firewall to allow inbound traffic from 5X IP addresses
2. Allow 5X's static IP addresses through your firewall or security group
```
35.236.200.239/32
35.230.162.249/32
```
3. The database must be accessible over the internet (or VPN/SSH tunnel)
4. You must have SUPERUSER or database owner privileges.
5. (Optional) Create a 5X user with SUPERUSER permission
```sql theme={null}
-- PostgreSQL Setup for 5X Platform
BEGIN;
-- Create user for 5X platform
CREATE USER FIVEX_USER WITH PASSWORD 'your_secure_password';
-- Grant database connection privileges
GRANT CONNECT ON DATABASE your_database TO FIVEX_USER;
-- Grant schema usage and creation privileges
GRANT USAGE, CREATE ON SCHEMA public TO FIVEX_USER;
-- Grant table privileges
GRANT SELECT, INSERT, UPDATE, DELETE ON ALL TABLES IN SCHEMA public TO FIVEX_USER;
ALTER DEFAULT PRIVILEGES IN SCHEMA public GRANT SELECT, INSERT, UPDATE, DELETE ON TABLES TO FIVEX_USER;
-- Grant sequence privileges
GRANT USAGE, SELECT ON ALL SEQUENCES IN SCHEMA public TO FIVEX_USER;
ALTER DEFAULT PRIVILEGES IN SCHEMA public GRANT USAGE, SELECT ON SEQUENCES TO FIVEX_USER;
-- Grant function privileges
GRANT EXECUTE ON ALL FUNCTIONS IN SCHEMA public TO FIVEX_USER;
ALTER DEFAULT PRIVILEGES IN SCHEMA public GRANT EXECUTE ON FUNCTIONS TO FIVEX_USER;
-- Additional privileges for metadata access
GRANT SELECT ON pg_catalog.pg_tables TO FIVEX_USER;
GRANT SELECT ON information_schema.tables TO FIVEX_USER;
GRANT SELECT ON information_schema.columns TO FIVEX_USER;
COMMIT;
```
**Step 2: Database connection details**
Enter your Postgres connection information
1. Enter 'Host' & 'Port' details
2. Enter 'Database' name
3. Enter 'Username' & 'Password'
4. Click on 'Connect' to finish the process
**Step 1 of 4: Enable required APIs in Google Cloud**
1. Go to the [Google Cloud Console](https://console.cloud.google.com)
2. Search for 'APIs & Services' and open the APIs & Services page. Click on 'Enabled APIs & services' button
3. Search and enable:
* BigQuery API
* Cloud Resource Manager API
Ensure both APIs show as "Enabled" in your dashboard.
**Important:** Use an account with Project Admin permissions. API changes might take a few minutes to take effect.
**Step 2 of 4: Create a Service Account**
1. In the GCP Console, search for 'Service Accounts' and click on Service Accounts
2. Click '+ Create Service Account'
3. Fill in the Service account name and add a description if you'd like (For example: 5X\_Service\_Account)
4. Click 'Create and continue'
5. In the second step, 'Grant this service account access to project', give the following permissions:
* BigQuery User
* Project IAM Admin (Optional)
'Project IAM Admin' permission enables us to give you an ability to manage Google BigQuery users on the 5X teams page.
Click 'Continue' and then click 'Done'.
**Step 3 of 4: Generate JSON Key**
1. Go to IAM & Admin > Service Accounts, and click on the service account you just created
2. Go to the 'Keys' tab
3. Click "Add Key" > "Create new key"
4. Choose JSON and click 'Create'
5. Save the downloaded .json file
**Important:** Keep the downloaded JSON file secure—it contains sensitive credentials.
**Step 4 of 4: Final step**
Complete the connection in the 5X platform:
1. Upload the .json file you just downloaded
2. Select all the project ID(s) you want to add to 5X
3. Complete the connection process
3. **Test and validate connection**
* Click **"Test Connection"**
* Resolve any connection issues
* Confirm successful connection
* **Workspace provisioning begins automatically** after successful connection test
### Alternative: Book a free setup call
If you need assistance with configuring your existing warehouse connection, our team is here to help:
**Get personalized assistance with:**
* Warehouse connection configuration
* Permission setup and troubleshooting
* Best practices for your specific environment
* Security and performance optimization
Our technical team will guide you through the entire setup process to ensure a smooth integration with your existing data infrastructure.
**To schedule your call:**
1. Click **"Book a free setup call"** button on the warehouse selection screen
2. Choose a convenient time slot from our calendar
3. Provide brief details about your current warehouse setup
4. Receive calendar invitation with meeting details
## Troubleshooting common issues
**Email verification problems:**
* Check spam/junk folder
* Wait 5-10 minutes for delivery
* Request new verification email
**Password requirements:**
* Minimum 8 characters
* Include uppercase, lowercase, number, and special character
**Corporate email issues:**
* Ensure business domain (not personal email)
* Contact IT if domain is blocked
* Try Google authentication alternative
**Network problems:**
* Check firewall settings and IP whitelisting
* Verify VPN connectivity
* Ensure correct ports are open
**Authentication failures:**
* Verify credentials in source system
* Check service account permissions
* Ensure credentials haven't expired
**Permission errors:**
* Review required permissions checklist
* Contact database administrator
* Verify role assignments
**Stuck provisioning:**
* Wait additional 5 minutes
* Refresh page for updated status
* Check detailed logs for errors
**Failed provisioning:**
* Verify warehouse connection stability
* Check cloud provider service status
* Contact [support@5x.co](mailto:support@5x.co)
## What's next?
Congratulations! You've successfully completed the initial setup of your 5X Platform workspace. Your environment is now ready for data integration and analytics.
**Next:** Configure app connections and credentials
Set up secure connections to your data sources and applications.
***
Return to quickstart guide overview
Contact our support team
2. **Select your configuration**
* **Plan:** Choose from available plans (Standard is pre-selected)
* **Cloud:** Select your preferred cloud provider (AWS, GCP, or Azure)
* **Region:** Choose the region closest to your users for optimal performance
3. **Complete setup and begin provisioning**
* Review your selections
* Click **"Continue with free trial"** to proceed
* Your workspace with a 5X managed snowflake warehouse will be provisioned. The provisioning process will take around 5 minutes.
### Option B: Connect existing warehouse
1. **Select your warehouse type**
Enterprise cloud data warehouse
Google Cloud serverless warehouse
Amazon cloud data warehouse
Open source relational database
2. **Enter connection details**
**Step 1: Prerequisites**
Before proceeding, ensure you have:
1. **Required Snowflake roles:** ACCOUNTADMIN, SECURITYADMIN, and SYSADMIN
2. **Network access:** If you have network policies on your Snowflake account, allowlist these static IPs:
```
35.236.200.239/32
35.230.162.249/32
```
**Step 2: Create Snowflake user & role for 5X**
Create a SQL file and run the following script in your Snowflake console:
```sql theme={null}
begin;
-- create variables for user / password / role / warehouse / database (needs to be uppercase for objects)
set role_name = 'FIVEX_ROLE';
set user_name = 'FIVEX_USER';
set user_password = 'yourpassword';
set warehouse_name = 'FIVEX_WAREHOUSE';
-- change role to securityadmin for user / role steps
use role securityadmin;
-- create role for fivex
create role if not exists identifier($role_name);
grant role identifier($role_name) to role SYSADMIN;
-- create a user for fivex
create user if not exists identifier($user_name)
password = $user_password
default_role = $role_name
default_warehouse = $warehouse_name;
grant role identifier($role_name) to user identifier($user_name);
-- set binary_input_format to BASE64
ALTER USER identifier($user_name) SET BINARY_INPUT_FORMAT = 'BASE64';
-- change role to sysadmin for warehouse / database steps
use role sysadmin;
-- create a warehouse for fivex (optional)
create warehouse if not exists identifier($warehouse_name)
warehouse_size = xsmall
warehouse_type = standard
auto_suspend = 60
auto_resume = true
initially_suspended = true;
-- grant fivex role access to warehouse
grant USAGE
on warehouse identifier($warehouse_name)
to role identifier($role_name);
--grant fivex access to users and roles for team management
use role ACCOUNTADMIN;
grant create user on account to role identifier($role_name);
grant create role on account to role identifier($role_name);
grant manage grants on account to role identifier($role_name);
-- change role to ACCOUNTADMIN for utilization & audit logs related steps
grant IMPORTED PRIVILEGES on database SNOWFLAKE to role identifier($role_name);
use role sysadmin;
commit;
```
**Important:** Replace 'yourpassword' in the script above with a strong, secure password. You can customize names, but we recommend keeping FIVEX\_USER, FIVEX\_ROLE and FIVEX\_WAREHOUSE.
**Step 3: Upload authentication key pair**
For secure key-pair authentication:
1. Generate a private/public key pair (if not already done)
2. In the 5X platform, enter:
* **Account URL:** `https://account_name.region.snowflakecomputing.com`
* **Username:** `FIVEX_USER` (or your custom username)
* **Private Key:** Paste your private key content
* **Passphrase:** Only required if your private key is encrypted
3. Run this script to update the RSA public key in Snowflake:
```sql theme={null}
ALTER USER SET RSA_PUBLIC_KEY = '';
```
**Step 4: Enter connection details**
Complete the connection form with your existing Snowflake configuration:
* **Default Warehouse:** `FIVEX_WAREHOUSE` (or your custom warehouse name)
* **Default Role:** `FIVEX_ROLE` (or your custom role name)
* **Plan:** Enter your current Snowflake plan/edition
* **Cloud:** Specify your existing cloud provider (AWS, GCP, or Azure)
* **Region:** Enter the region where your Snowflake account is hosted
**Step 1: Pre-requisites**
1. Log in to AWS Console
2. Navigate to Amazon Redshift
3. Select your cluster and copy the Endpoint URL (without jdbc:redshift:// prefix)
```
http://cluster-name.account-id.region.redshift.amazonaws.com
```
4. Database name is the initial database created with your cluster. You can find this information in your cluster configuration.
5. Use username and password authentication for database access. Ensure the user has appropriate permissions for your use case.
6. (Optional) Run on Amazon Redshift SQL editor for connection details.
```sql theme={null}
begin;
-- Create variables (for reference; Redshift doesn’t support SQL variables directly)
-- user_name = 'FIVEX_USER';
-- user_password = 'yourpassword';
-- database_name = 'FIVEX_DATABASE';
-- schema_name = 'FIVEX_SCHEMA';
-- Create a user
CREATE USER FIVEX_USER PASSWORD 'yourpassword';
-- Create a database (optional)
CREATE DATABASE FIVEX_DATABASE;
-- Grant DB-level permissions
GRANT CREATE ON DATABASE FIVEX_DATABASE TO FIVEX_USER;
GRANT TEMPORARY ON DATABASE FIVEX_DATABASE TO FIVEX_USER;
-- Create schema
CREATE SCHEMA IF NOT EXISTS FIVEX_SCHEMA;
-- Grant schema-level permissions
GRANT ALL ON SCHEMA FIVEX_SCHEMA TO FIVEX_USER;
GRANT ALL PRIVILEGES ON ALL TABLES IN SCHEMA FIVEX_SCHEMA TO FIVEX_USER;
-- Grant access to system catalogs
GRANT USAGE ON SCHEMA information_schema TO FIVEX_USER;
GRANT SELECT ON ALL TABLES IN SCHEMA information_schema TO FIVEX_USER;
GRANT USAGE ON SCHEMA pg_catalog TO FIVEX_USER;
GRANT SELECT ON ALL TABLES IN SCHEMA pg_catalog TO FIVEX_USER;
-- Grant access to all schemas
GRANT USAGE ON ALL SCHEMAS IN DATABASE FIVEX_DATABASE TO FIVEX_USER;
GRANT SELECT ON ALL TABLES IN DATABASE FIVEX_DATABASE TO FIVEX_USER;
-- Set default privileges in FIVEX schema
ALTER DEFAULT PRIVILEGES IN SCHEMA FIVEX_SCHEMA
GRANT ALL ON TABLES TO FIVEX_USER;
-- Set default privileges in public schema
ALTER DEFAULT PRIVILEGES IN SCHEMA public
GRANT SELECT ON TABLES TO FIVEX_USER;
-- Grant execute on functions
GRANT EXECUTE ON ALL FUNCTIONS IN SCHEMA public TO FIVEX_USER;
GRANT EXECUTE ON ALL FUNCTIONS IN SCHEMA FIVEX_SCHEMA TO FIVEX_USER;
commit;
```
**Step 2: Basic connection information**
1. Enter 'Host' & 'Port' details
2. Enter 'Database' name
3. Enter 'Username' & 'Password'
4. Select 'Cluster Region'
5. Click on 'Next step' to proceed
**Step 3: Security and Network configuration**
1. Go to AWS Console > VPC > Security Groups
2. Find your Redshift cluster's security group and Edit inbound rules
3. Add a new rule for each IP with Port 5439
```
35.236.200.239/32
35.230.162.249/32
```
4. Database name is the initial database created with your cluster. You can find this information in your cluster configuration.
5. If your cluster is in a VPC, also ensure:
* Subnet is properly configured
* Route tables allow internet access
* DNS resolution is enabled
**Step 1: Pre-requisites**
1. Open port 5432 (or your custom port) in your firewall to allow inbound traffic from 5X IP addresses
2. Allow 5X's static IP addresses through your firewall or security group
```
35.236.200.239/32
35.230.162.249/32
```
3. The database must be accessible over the internet (or VPN/SSH tunnel)
4. You must have SUPERUSER or database owner privileges.
5. (Optional) Create a 5X user with SUPERUSER permission
```sql theme={null}
-- PostgreSQL Setup for 5X Platform
BEGIN;
-- Create user for 5X platform
CREATE USER FIVEX_USER WITH PASSWORD 'your_secure_password';
-- Grant database connection privileges
GRANT CONNECT ON DATABASE your_database TO FIVEX_USER;
-- Grant schema usage and creation privileges
GRANT USAGE, CREATE ON SCHEMA public TO FIVEX_USER;
-- Grant table privileges
GRANT SELECT, INSERT, UPDATE, DELETE ON ALL TABLES IN SCHEMA public TO FIVEX_USER;
ALTER DEFAULT PRIVILEGES IN SCHEMA public GRANT SELECT, INSERT, UPDATE, DELETE ON TABLES TO FIVEX_USER;
-- Grant sequence privileges
GRANT USAGE, SELECT ON ALL SEQUENCES IN SCHEMA public TO FIVEX_USER;
ALTER DEFAULT PRIVILEGES IN SCHEMA public GRANT USAGE, SELECT ON SEQUENCES TO FIVEX_USER;
-- Grant function privileges
GRANT EXECUTE ON ALL FUNCTIONS IN SCHEMA public TO FIVEX_USER;
ALTER DEFAULT PRIVILEGES IN SCHEMA public GRANT EXECUTE ON FUNCTIONS TO FIVEX_USER;
-- Additional privileges for metadata access
GRANT SELECT ON pg_catalog.pg_tables TO FIVEX_USER;
GRANT SELECT ON information_schema.tables TO FIVEX_USER;
GRANT SELECT ON information_schema.columns TO FIVEX_USER;
COMMIT;
```
**Step 2: Database connection details**
Enter your Postgres connection information
1. Enter 'Host' & 'Port' details
2. Enter 'Database' name
3. Enter 'Username' & 'Password'
4. Click on 'Connect' to finish the process
**Step 1 of 4: Enable required APIs in Google Cloud**
1. Go to the [Google Cloud Console](https://console.cloud.google.com)
2. Search for 'APIs & Services' and open the APIs & Services page. Click on 'Enabled APIs & services' button
3. Search and enable:
* BigQuery API
* Cloud Resource Manager API
Ensure both APIs show as "Enabled" in your dashboard.
**Important:** Use an account with Project Admin permissions. API changes might take a few minutes to take effect.
**Step 2 of 4: Create a Service Account**
1. In the GCP Console, search for 'Service Accounts' and click on Service Accounts
2. Click '+ Create Service Account'
3. Fill in the Service account name and add a description if you'd like (For example: 5X\_Service\_Account)
4. Click 'Create and continue'
5. In the second step, 'Grant this service account access to project', give the following permissions:
* BigQuery User
* Project IAM Admin (Optional)
'Project IAM Admin' permission enables us to give you an ability to manage Google BigQuery users on the 5X teams page.
Click 'Continue' and then click 'Done'.
**Step 3 of 4: Generate JSON Key**
1. Go to IAM & Admin > Service Accounts, and click on the service account you just created
2. Go to the 'Keys' tab
3. Click "Add Key" > "Create new key"
4. Choose JSON and click 'Create'
5. Save the downloaded .json file
**Important:** Keep the downloaded JSON file secure—it contains sensitive credentials.
**Step 4 of 4: Final step**
Complete the connection in the 5X platform:
1. Upload the .json file you just downloaded
2. Select all the project ID(s) you want to add to 5X
3. Complete the connection process
3. **Test and validate connection**
* Click **"Test Connection"**
* Resolve any connection issues
* Confirm successful connection
* **Workspace provisioning begins automatically** after successful connection test
### Alternative: Book a free setup call
If you need assistance with configuring your existing warehouse connection, our team is here to help:
**Get personalized assistance with:**
* Warehouse connection configuration
* Permission setup and troubleshooting
* Best practices for your specific environment
* Security and performance optimization
Our technical team will guide you through the entire setup process to ensure a smooth integration with your existing data infrastructure.
**To schedule your call:**
1. Click **"Book a free setup call"** button on the warehouse selection screen
2. Choose a convenient time slot from our calendar
3. Provide brief details about your current warehouse setup
4. Receive calendar invitation with meeting details
## Troubleshooting common issues
**Email verification problems:**
* Check spam/junk folder
* Wait 5-10 minutes for delivery
* Request new verification email
**Password requirements:**
* Minimum 8 characters
* Include uppercase, lowercase, number, and special character
**Corporate email issues:**
* Ensure business domain (not personal email)
* Contact IT if domain is blocked
* Try Google authentication alternative
**Network problems:**
* Check firewall settings and IP whitelisting
* Verify VPN connectivity
* Ensure correct ports are open
**Authentication failures:**
* Verify credentials in source system
* Check service account permissions
* Ensure credentials haven't expired
**Permission errors:**
* Review required permissions checklist
* Contact database administrator
* Verify role assignments
**Stuck provisioning:**
* Wait additional 5 minutes
* Refresh page for updated status
* Check detailed logs for errors
**Failed provisioning:**
* Verify warehouse connection stability
* Check cloud provider service status
* Contact [support@5x.co](mailto:support@5x.co)
## What's next?
Congratulations! You've successfully completed the initial setup of your 5X Platform workspace. Your environment is now ready for data integration and analytics.
**Next:** Configure app connections and credentials
Set up secure connections to your data sources and applications.
***
Return to quickstart guide overview
Contact our support team