> ## Documentation Index
> Fetch the complete documentation index at: https://docs.5x.co/llms.txt
> Use this file to discover all available pages before exploring further.
# Step 5: Ingest Your Data
> Connect and ingest data from 600+ sources into your 5X platform with seamless integration capabilities
**Estimated Time:** 15-30 minutes
Configure your first data ingestion pipeline and start bringing data from your various sources into the 5X platform.
## Ready to ingest data
With your app connections now configured, you're now ready to set up your first data ingestion pipeline and start bringing data into your warehouse.
## What is data ingestion?
Data ingestion is the process of bringing raw data from external systems into your warehouse, standardizing its format and centralizing it for further use. Whether you're pulling sales data from a CRM, logs from internal databases, or campaign performance from a marketing platform, 5X enables you to ingest with minimal engineering effort.
The 5X platform provides a managed, secure, and no-code user experience for data ingestion, eliminating the complexity of managing multiple data integration tools.
## Your ingestion toolkit: 600+ connectors
5X supports a broad catalog of 600+ out-of-the-box connectors, including:
**Popular SaaS applications:**
* Salesforce, HubSpot, NetSuite
* Zendesk, Shopify, Stripe
* Slack, Jira, Confluence
**All major database systems:**
* PostgreSQL, MySQL, MongoDB
* Redshift, Snowflake, BigQuery
* Oracle, SQL Server, Cassandra
**Analytics and marketing platforms:**
* Google Analytics, Facebook Ads
* Mixpanel, Klaviyo, Mailchimp
* Adobe Analytics, LinkedIn Ads
**File and cloud storage:**
* Google Sheets, Excel (via cloud)
* Amazon S3, Google Cloud Storage
* FTP, SFTP, Dropbox
If a connector is not available in our catalog, you can request custom connectors, which are typically delivered within days. You can also ingest from modern APIs or legacy sources using custom integration blueprints maintained by 5X.
## Setting up your first ingestion pipeline
Let's walk through creating your first data ingestion pipeline:
### 1. Access the ingestion module
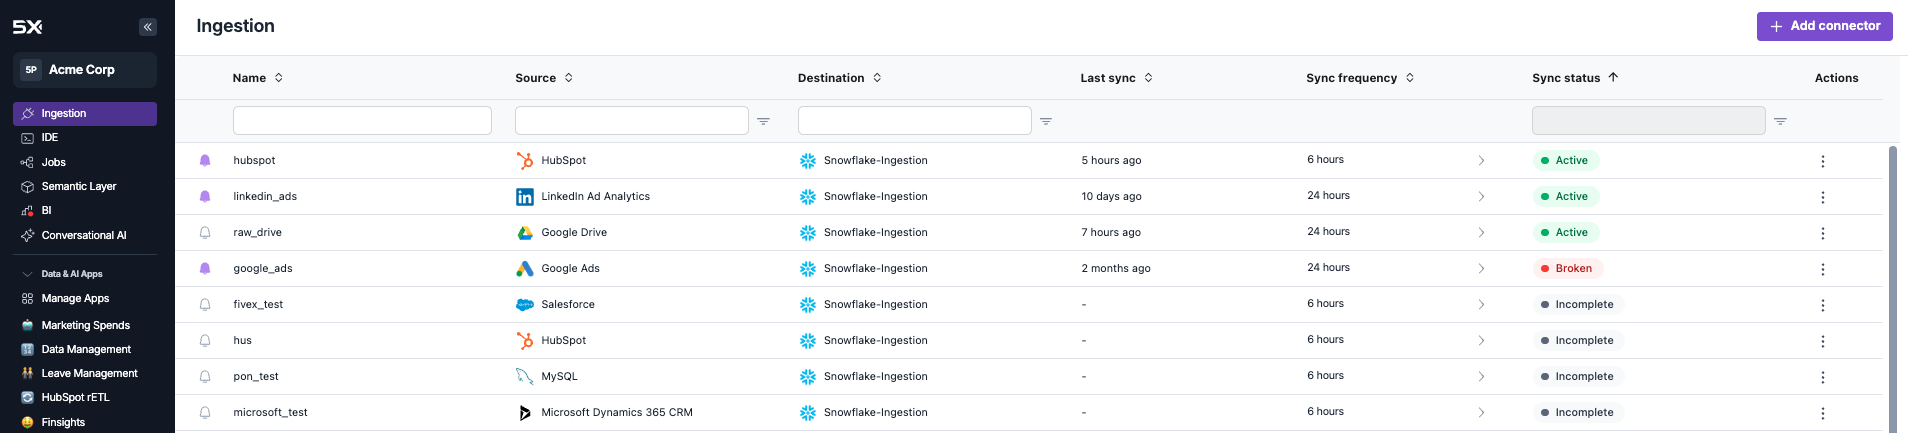
1. **Navigate to Ingestion**
* Visit [platform.5x.co](https://platform.5x.co) and log into your workspace
* In the left sidebar, click on **Ingestion**
 2. **Start New Connector Setup**
* On the ingestion dashboard, click **Add Connector** to begin setup
### 2. Select your data source
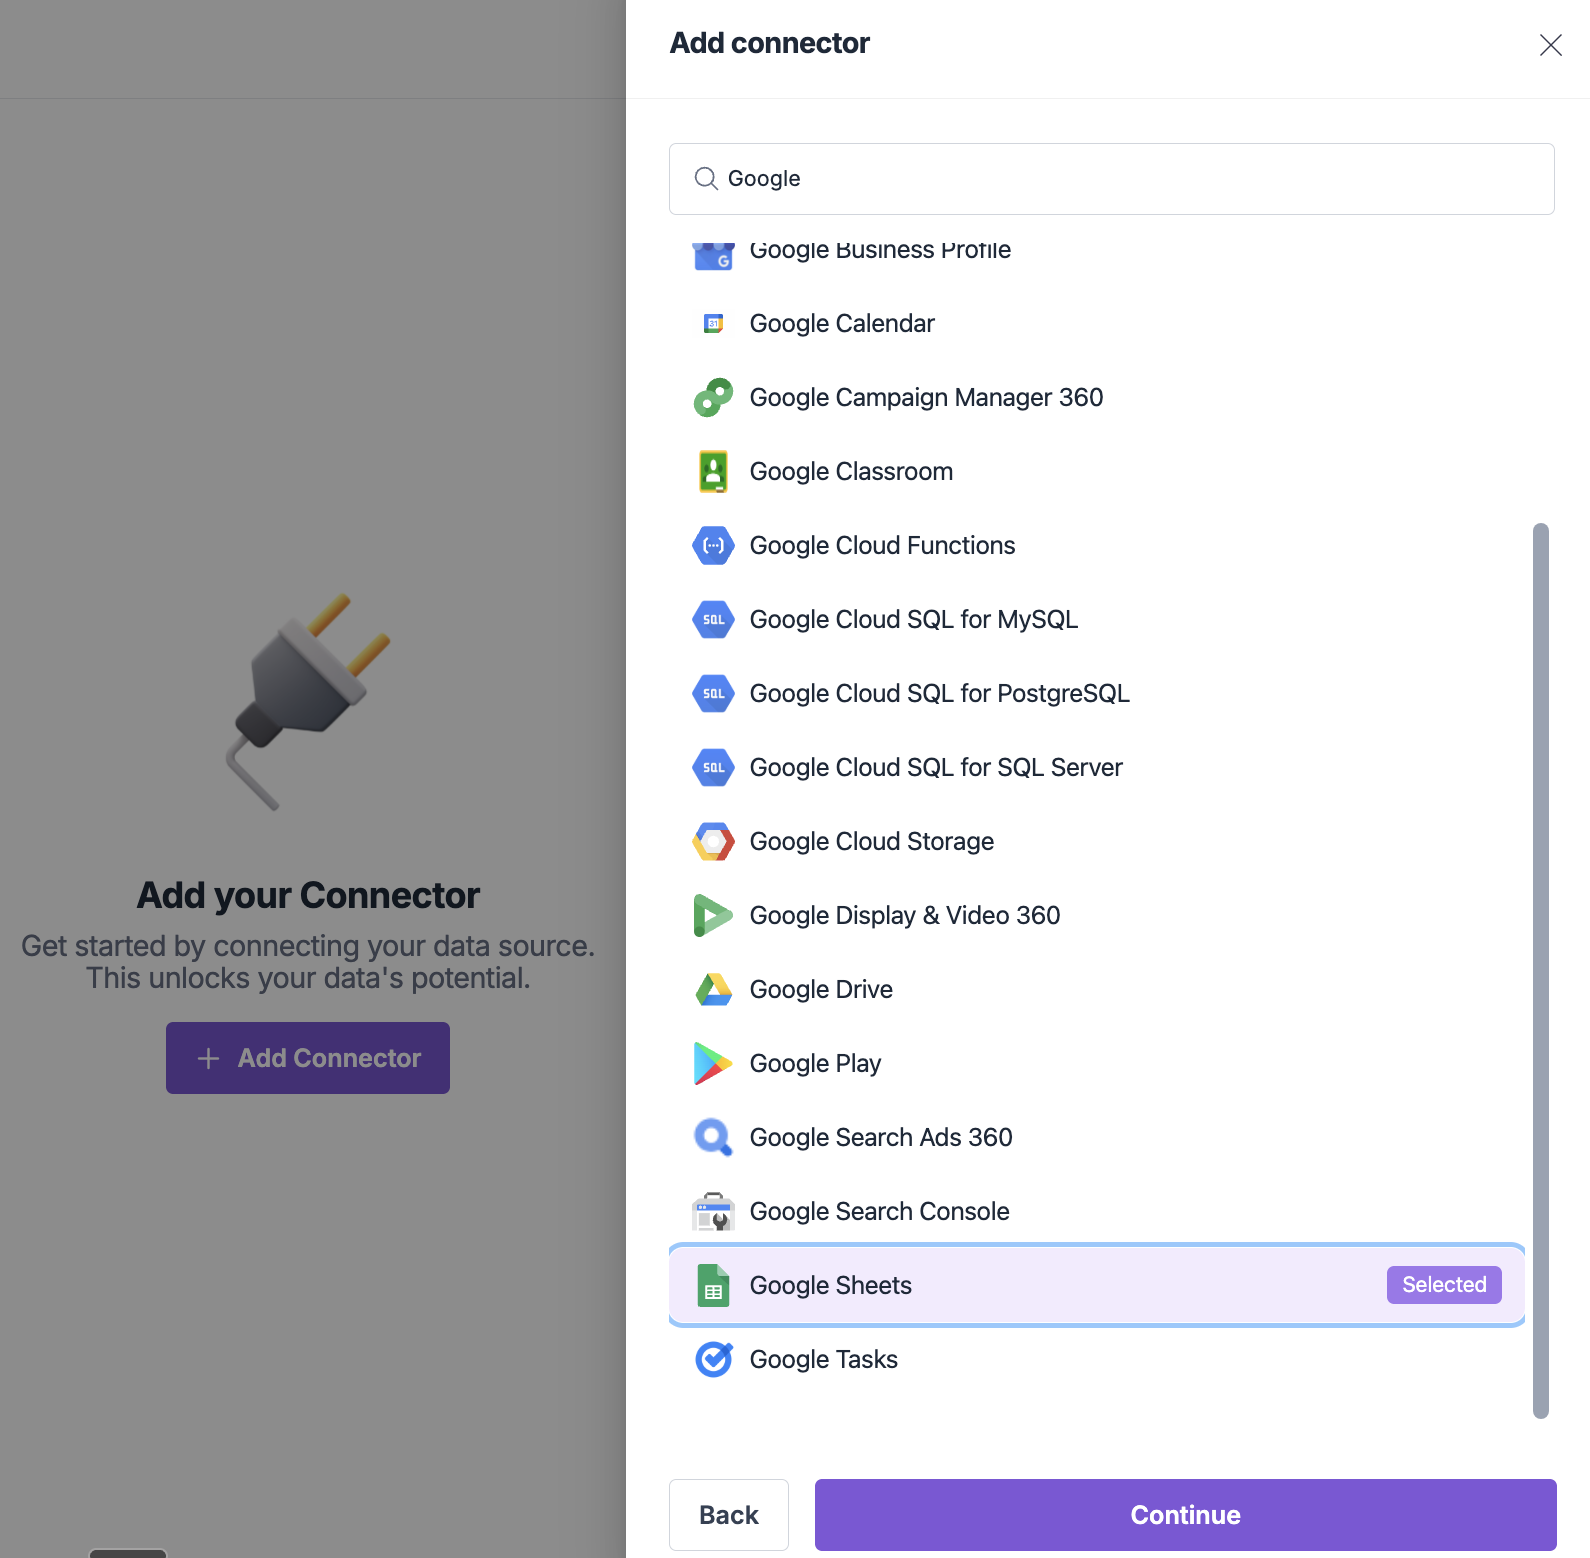
1. **Choose from 600+ Connectors**
* Use the search bar to find your desired source (e.g., "Google Sheets" or "Salesforce")
* Click the source card to begin the configuration process
2. **Start New Connector Setup**
* On the ingestion dashboard, click **Add Connector** to begin setup
### 2. Select your data source
1. **Choose from 600+ Connectors**
* Use the search bar to find your desired source (e.g., "Google Sheets" or "Salesforce")
* Click the source card to begin the configuration process
 2. **Select a Destination**
 3. **Enter Destination Schema**
 ### 3. Configure your connector
The setup screen will prompt you for several fields. These vary by connector, but common fields include:
### 3. Configure your connector
The setup screen will prompt you for several fields. These vary by connector, but common fields include:
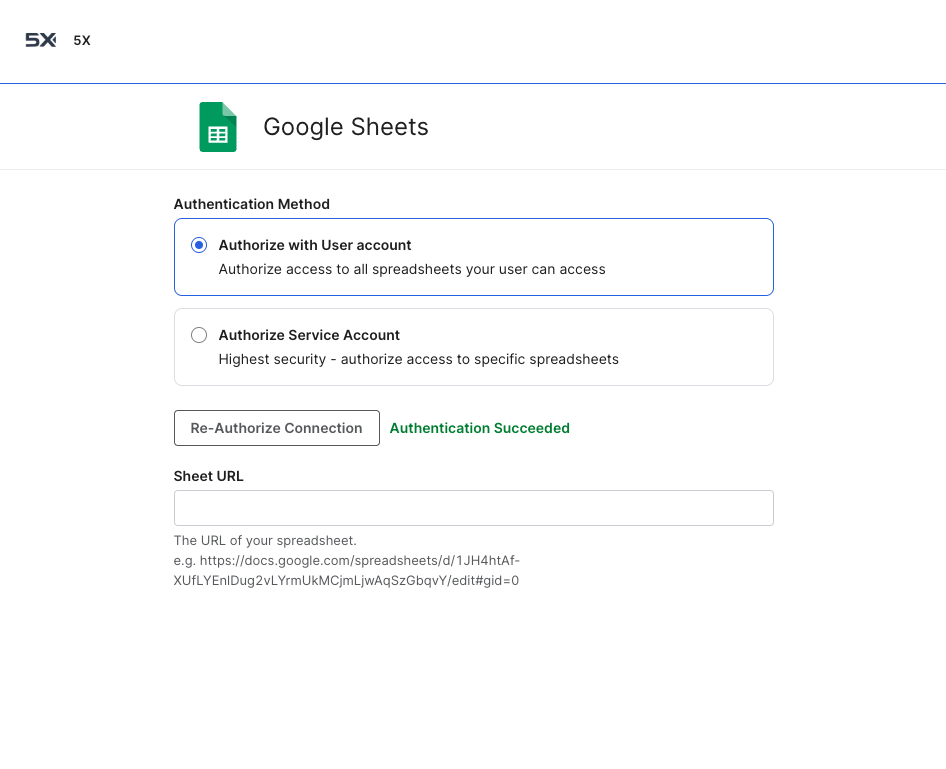 **Required Information:**
* **Destination schema name:** Choose where data will be written in your warehouse
* **Connection parameters:** Configure source-specific connection settings
* **Data selection:** Choose which objects, tables, or datasets to sync
* **Additional settings:** Configure any source-specific parameters as required
**Note:** The connector name is automatically generated based on your destination schema name.
**Authentication varies by connector type and may include:**
* **OAuth flows:** Direct login with your account credentials
* **API keys and tokens:** Service account credentials or API authentication
* **Database credentials:** Username, password, and connection strings
* **Certificate-based:** Private keys or certificate files for secure connections
* **Resource-specific access:** Direct URLs or specific resource identifiers
The system will guide you through the appropriate authentication method for your selected source.
**Additional configuration options may include:**
* **Data filtering and transformation:** Apply filters or basic transformations during ingestion
* **Security settings:** Configure data privacy and access controls
* **Performance tuning:** Optimize sync behavior for your specific use case
* **Compliance features:** Enable data governance and audit capabilities
Available options depend on the specific connector and source system capabilities.
Use descriptive destination schema names since they determine your connector names and where data lands in your warehouse. Good examples: `salesforce_crm`, `google_analytics`, `postgres_customers`, `shopify_orders`. Avoid spaces and use underscores for multi-word schemas.
### 4. Complete setup and start initial sync
1. **Review Configuration**
* Double-check all settings and authentication details
* Verify data selection and sync frequency
* Preview the sync configuration
2. **Trigger Initial Sync**
* Click **Continue** through each configuration screen
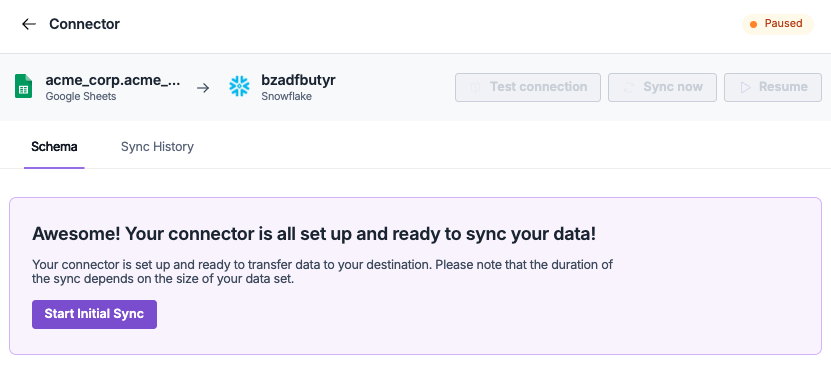
* Once setup is complete, you'll see a confirmation screen
* Click **Start Initial Sync** to begin your first data transfer
* The initial sync will run immediately to populate your warehouse with data
**Required Information:**
* **Destination schema name:** Choose where data will be written in your warehouse
* **Connection parameters:** Configure source-specific connection settings
* **Data selection:** Choose which objects, tables, or datasets to sync
* **Additional settings:** Configure any source-specific parameters as required
**Note:** The connector name is automatically generated based on your destination schema name.
**Authentication varies by connector type and may include:**
* **OAuth flows:** Direct login with your account credentials
* **API keys and tokens:** Service account credentials or API authentication
* **Database credentials:** Username, password, and connection strings
* **Certificate-based:** Private keys or certificate files for secure connections
* **Resource-specific access:** Direct URLs or specific resource identifiers
The system will guide you through the appropriate authentication method for your selected source.
**Additional configuration options may include:**
* **Data filtering and transformation:** Apply filters or basic transformations during ingestion
* **Security settings:** Configure data privacy and access controls
* **Performance tuning:** Optimize sync behavior for your specific use case
* **Compliance features:** Enable data governance and audit capabilities
Available options depend on the specific connector and source system capabilities.
Use descriptive destination schema names since they determine your connector names and where data lands in your warehouse. Good examples: `salesforce_crm`, `google_analytics`, `postgres_customers`, `shopify_orders`. Avoid spaces and use underscores for multi-word schemas.
### 4. Complete setup and start initial sync
1. **Review Configuration**
* Double-check all settings and authentication details
* Verify data selection and sync frequency
* Preview the sync configuration
2. **Trigger Initial Sync**
* Click **Continue** through each configuration screen
* Once setup is complete, you'll see a confirmation screen
* Click **Start Initial Sync** to begin your first data transfer
* The initial sync will run immediately to populate your warehouse with data
 ### 5. Manage sync settings and data selection
Once your connector is active, you can manage its sync behavior and data selection from the connector details page:
**Access Sync Settings:**
* From the ingestion dashboard, click on your connector name
* Or use the Actions menu to access connector settings
* Manual Sync: Trigger syncs on-demand using the "Sync now" button
**Sync Frequency Options:**
Configure how often your data syncs using either:
* **Fixed Intervals:** Choose from preset options (1 minute to 24 hours)
* **CRON Expressions:** Set custom schedules using CRON syntax
**Schema and Table Selection:**
* Use the **Schema** tab to manage which data gets synced
* Select or deselect entire tables with checkboxes
* Choose specific columns within each table
* Use search functionality to find specific tables quickly
* Toggle "Show selected tables" to focus on active data sources
**Connector Management:**
* **Test connection:** Verify your source connection is working
* **Sync now:** Trigger an immediate sync outside the schedule
* **Pause:** Temporarily stop all syncing
### Best practices for secure ingestion
**Best Practices:**
* Use service accounts instead of personal credentials when possible
* Rotate API keys and credentials regularly
* Apply principle of least privilege for data access
* Monitor credential usage and access patterns
**Governance Recommendations:**
* Hash or exclude sensitive fields (PII, financial data) during ingestion
* Set up data retention policies for ingested data
* Document data sources and their business purposes
* Regular review and audit of active connectors
**Performance Tips:**
* Choose appropriate sync frequencies based on data change rates
* Use incremental sync for large datasets
* Schedule resource-intensive syncs during off-peak hours
## Troubleshooting common issues
**Common Issues:**
* Network connectivity problems
* Authentication failures (expired tokens, wrong credentials)
* Source system downtime or maintenance
* Firewall or security group restrictions
**Solutions:**
* **Verify connection settings:** Double-check host, port, and database names
* **Test authentication:** Ensure credentials are valid and have proper permissions
* **Check network connectivity:** Verify firewall rules and network access
* **Monitor source system status:** Check if the source system is operational
* **Review error logs:** Look for specific error messages in sync history
**Common Problems:**
* Data type mismatches between source and destination
* Unexpected null values in required fields
* Character encoding issues (special characters, unicode)
* Date format inconsistencies across systems
* Duplicate records or primary key violations
**Solutions:**
* **Review data type mappings:** Ensure compatible data types
* **Implement data validation:** Set up rules to catch quality issues
* **Add data cleaning:** Use transformations to standardize data
* **Monitor data quality:** Set up alerts for quality degradation
* **Document data quirks:** Note known issues and workarounds
## What's next?
With ingestion complete and your data flowing into the warehouse, you can now:
Query and explore your ingested data using the integrated SQL editor
Add teammates and set up permissions for collaborative data work
Discover advanced features when you're ready to go deeper
Ingestion is the critical first step in the 5X data lifecycle. With proper setup, it enables trusted, timely, and scalable data access across your organization.
**Next:** Explore your data
Query and explore your ingested data using the integrated SQL editor to understand its structure and quality.
***
Return to quickstart guide overview
Step 4: App connections and credentials
### 5. Manage sync settings and data selection
Once your connector is active, you can manage its sync behavior and data selection from the connector details page:
**Access Sync Settings:**
* From the ingestion dashboard, click on your connector name
* Or use the Actions menu to access connector settings
* Manual Sync: Trigger syncs on-demand using the "Sync now" button
**Sync Frequency Options:**
Configure how often your data syncs using either:
* **Fixed Intervals:** Choose from preset options (1 minute to 24 hours)
* **CRON Expressions:** Set custom schedules using CRON syntax
**Schema and Table Selection:**
* Use the **Schema** tab to manage which data gets synced
* Select or deselect entire tables with checkboxes
* Choose specific columns within each table
* Use search functionality to find specific tables quickly
* Toggle "Show selected tables" to focus on active data sources
**Connector Management:**
* **Test connection:** Verify your source connection is working
* **Sync now:** Trigger an immediate sync outside the schedule
* **Pause:** Temporarily stop all syncing
### Best practices for secure ingestion
**Best Practices:**
* Use service accounts instead of personal credentials when possible
* Rotate API keys and credentials regularly
* Apply principle of least privilege for data access
* Monitor credential usage and access patterns
**Governance Recommendations:**
* Hash or exclude sensitive fields (PII, financial data) during ingestion
* Set up data retention policies for ingested data
* Document data sources and their business purposes
* Regular review and audit of active connectors
**Performance Tips:**
* Choose appropriate sync frequencies based on data change rates
* Use incremental sync for large datasets
* Schedule resource-intensive syncs during off-peak hours
## Troubleshooting common issues
**Common Issues:**
* Network connectivity problems
* Authentication failures (expired tokens, wrong credentials)
* Source system downtime or maintenance
* Firewall or security group restrictions
**Solutions:**
* **Verify connection settings:** Double-check host, port, and database names
* **Test authentication:** Ensure credentials are valid and have proper permissions
* **Check network connectivity:** Verify firewall rules and network access
* **Monitor source system status:** Check if the source system is operational
* **Review error logs:** Look for specific error messages in sync history
**Common Problems:**
* Data type mismatches between source and destination
* Unexpected null values in required fields
* Character encoding issues (special characters, unicode)
* Date format inconsistencies across systems
* Duplicate records or primary key violations
**Solutions:**
* **Review data type mappings:** Ensure compatible data types
* **Implement data validation:** Set up rules to catch quality issues
* **Add data cleaning:** Use transformations to standardize data
* **Monitor data quality:** Set up alerts for quality degradation
* **Document data quirks:** Note known issues and workarounds
## What's next?
With ingestion complete and your data flowing into the warehouse, you can now:
Query and explore your ingested data using the integrated SQL editor
Add teammates and set up permissions for collaborative data work
Discover advanced features when you're ready to go deeper
Ingestion is the critical first step in the 5X data lifecycle. With proper setup, it enables trusted, timely, and scalable data access across your organization.
**Next:** Explore your data
Query and explore your ingested data using the integrated SQL editor to understand its structure and quality.
***
Return to quickstart guide overview
Step 4: App connections and credentials